I tend to take my time trying out products, which frustrates people who ask me what I think of a product the minute I show a new purchase. I can never tell them! LOL! The reason, as this Hourglass Illusion Hyaluronic Skin Tint will show, is because sometimes, I like giving things a second chance, if they don’t wow me off the bat. This one didn’t.
I bought this one quite a while ago, because I came across quite a few online raves for it and fell for it like the little sheep I am LOL! 😀 But when I received it, I wasn’t too charmed by it.
The primary reason was because I wasn’t sure what exactly it was. The name Hourglass Illusion Hyaluronic Skin Tint implies that it should be just a tint of colour on the skin. So I was expecting something light and sheer. Yet, when squeezed out of the tube, it was thick in texture, quite dry and fairly opaque. I was very confused so I set it aside.
I came back to it now and again, but never really took to it. It wasn’t until fairly recently, that I rediscovered it in my foundation drawer, decided to have another go, and suddenly, I was in love with it! 😀 It comes down to technique and expectations.
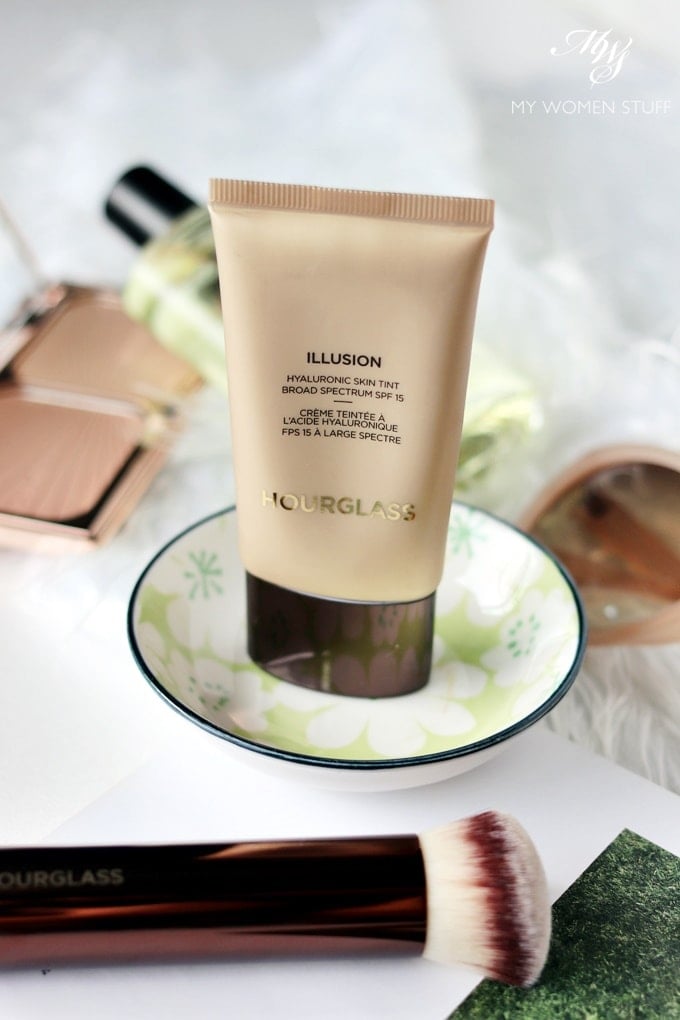
The Hourglass Illusion Hyaluronic Skin Tint is really a foundation. Don’t let the name fool you! It comes in a lovely portable squeeze tube which I think is excellent packaging for this product, because you really want to be able to control how much you can squeeze out of it.
The reason is this – you only need a tiny tiny amount of product for best results.
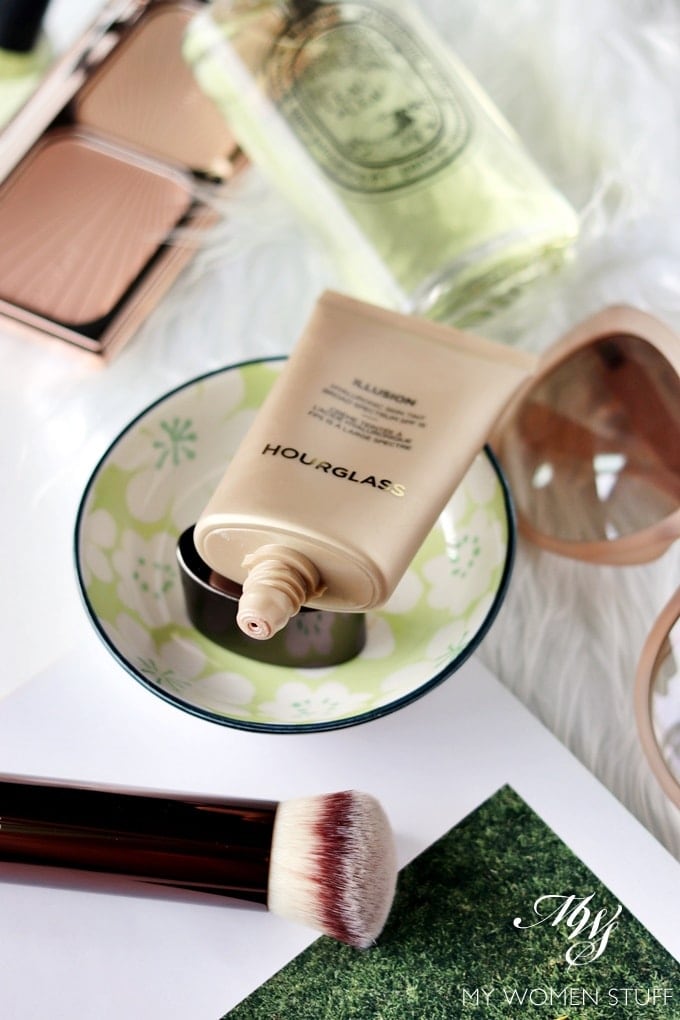
Note that I said above – it has a fairly thick texture squeezed out of the tube, almost like a paste. It also feels a little dry. Yet, the opacity is quite high. I peg this one therefore, as a medium coverage foundation or base product.
The trick I find, is to warm it up before applying to skin, and to use your fingers to apply for best results. The reason is because the warmth of your fingers and skin helps the product ‘melt’ a little, and meld to skin a little better. When I use a brush, I find I have to do a lot of blending to get it right. When I use my fingers, it is very quick and leaves it streak-free.
The second trick is to use just very little. What you want is to quite literally draw a veil over your skin. It is fairly opaque, yet transparent. I find that it evens out skintone very nicely, even if it does not cover all your blemishes – but there are ways around that.
I also find that the Hourglass Illusion Hyaluronic Skin Tint works best on well-prepped skin. If you have flaky bits of skin, it will catch and accentuate the flaky and dry bits of your skin. You really must ensure that your base canvas is already fairly smooth and well-moisturised for best effects.
I have skin that tends to dry, but I rediscovered this at about the same time I discovered the moisture sandwich method, and I think that that’s helped me appreciate this product better. By keeping my skin well moisturised, it is fairly flake-free and smooth. I don’t particularly have a problem with lines, so I cannot tell you if it will settle into fine lines, but for me, this gives me a lovely smooth, even-toned canvas to work from, and that is really enough for me.
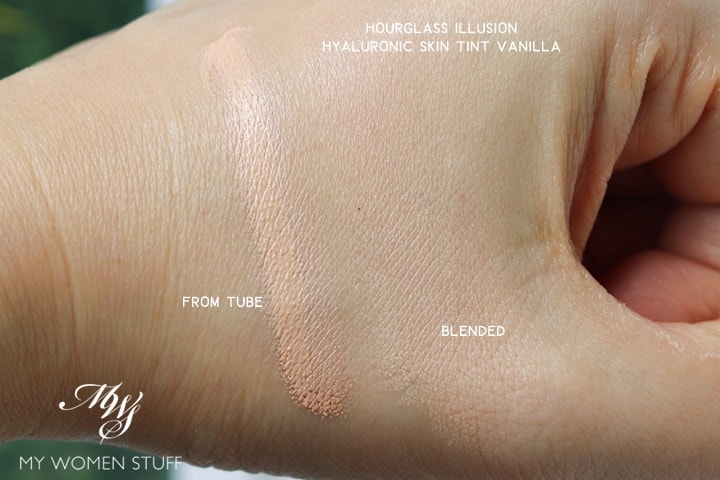
I wear the shade Vanilla, which you can see in the picture, is a slightly cool, light tone. This is the lightest shade in the range. You may also see from the swatch from the tube, how thick it really is. It looks cakey and dry, and I will tell you that if you were to plaster it over your face straight from the tube or as you would a regular foundation, it will look and behave like wall plaster. It will look thick, dry, and it will settle into lines and eventually crack. If you use a brush, you will see streaks because there is too much product. For this reason, I find that those complaining about this drying and cracking have likely used far too much product. Remember this mantra – less is more!
What you really want to do is to put a tiny dot on the back of your hand, spread it to warm it up, and then apply a thin layer to your skin and blend with your fingers. Done this way, it enhances your skin’s natural glow and stays put better too.
What about coverage? You may wonder. For me, it’s enough. That said however, I do tend to prefer a lighter, sheerer base coverage. If you like something with fuller coverage, I’d recommend going for either the Bobbi Brown Longwear Weightless Foundation, Bobbi Brown Nourishing Glow Foundation or the Nars Natural Radiant Longwear Foundation instead of this one.
Think of the Hourglass Illusion Hyaluronic Skin Tint therefore as a BB/CC cream. That’s how I perceive it. Not exactly a foundation, but opaque yet transparent enough that I’m happy to wear it as one.
Let me show you how it looks when I wear it – I wear the shade Vanilla. As usual, these photos are not retouched or filtered.
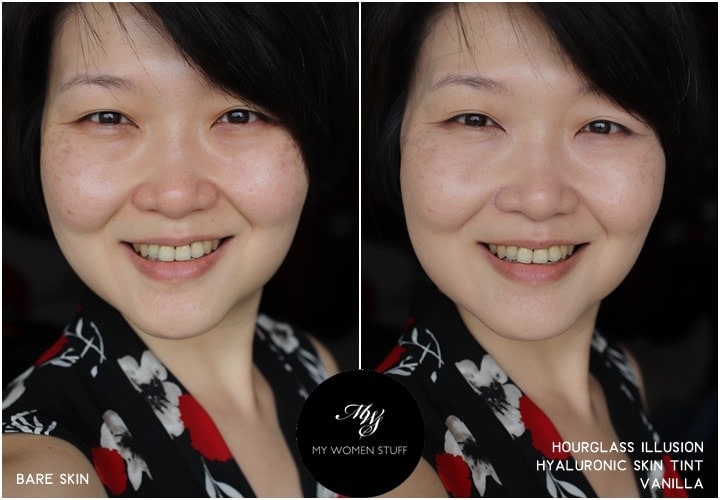
Bare skin on left, and you can see the parts with redness, shadows and pigmentation around my cheeks. On right, with a thin layer of the Hourglass Illusion Hyaluronic Skin Tint applied with fingers, and my canvas looks more even does it not? The shadows around my eyes are hidden, the redness is toned down, there is a little coverage so you don’t see my pigmentation as much. Yet, there is also a hint of a glow to the skin. It’s like having a soft glow filter applied to your skin in real life.
I’m going to show you now how it looks after I’ve put on all my makeup.
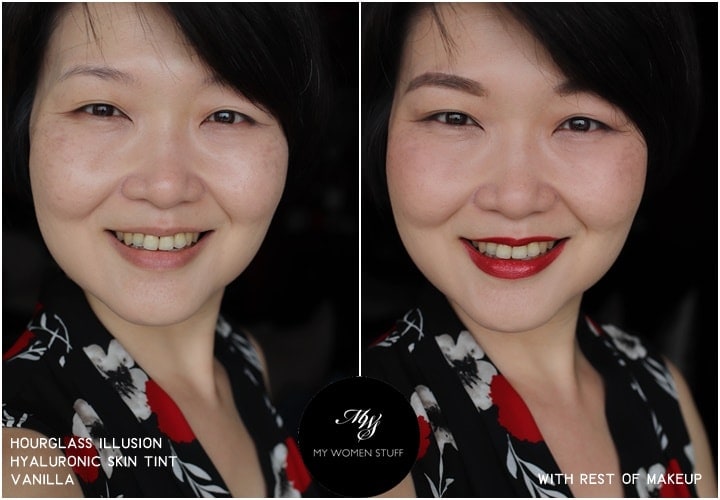
On left, is the picture from above. To add a little more coverage where I need it, I dab and blend a little concealer (use this method for a flawless result), then I dust a thin layer of the Hourglass Ambient Lighting Powder in Diffused light all over. The powder helps set the base while adding another veil of coverage. The trick you see, is in working with very thin layers to maintain a much more natural result.
I’ve got a very light shadow and liner on, although you can’t tell, a bit of warmth on my skin with a light brozning powder, a light hint of blush, brows and a lovely bright lipstick. When I wear something toned down, I like going with a bright lip for impact 😀
For me, this base lasts all day without settling or drying my skin. Might it to do with the hyaluronic acid as the name suggests? To be honest, I cannot say. It isn’t exactly moisturising either. When I use it the way as detailed here, it just feels weightless on my skin, and my skin looks just like skin – just that much better. I love it for days when I don’t want to put too much on, or when I want to channel the barely there makeup look. I do like the Hourglass Illusion Hyaluronic Skin Tint a lot! But I can also tell you that not many people will 😀
IN A NUTSHELL
The Hourglass Illusion Hyaluronic Skin Tint is a medium coverage foundation or BB/CC Cream. It has a thick, paste-like texture that can feel a little dry and hard to blend. I find the best way to work with this is to use your fingers, and to only use a little product. You can build it up as you go where you need it. When used in thin layers on the skin, I find the coverage good enough to even out skin tone, and to offer a little coverage where you need it. You can apply concealer after that if you want to. You don’t have to set with powder either, unless you want a little more coverage. For me, it sits on my skin well and lasts me all day. It is not drying nor does it settle into lines or pores, and it just makes my skin look like my skin, but better. I love this one a lot but it took me a while to!
PROS: Non-scented, Portable packaging, Easy to control product as you only need very little each time, Melds well with skin if you warm up and apply and blend using fingers, Medium opacity, Evens out skin tone well without masking skin, Lasts all day on my skin
CONS: Pricey, Thick paste-like texture can feel thick on skin if too much is used, High opacity can look obvious on skin if not well blended, Can accentuate very dry or flaky skin
WHO WILL LIKE THIS: Anyone who appreciates using thin layers of product, Anyone who does not have flaky or very dry skin
PRICE: RM253 | US$56 | £50 for 30ml
WHERE TO BUY: Sephora stores and online, SpaceNK, Cult Beauty, Nordstrom
If you’re interested, here are the ingredients in the Hourglass Illusion Hyaluronic Skin Tint.
Active Ingredients: Octinoxate 7.0%, Octisalate 4.0%, Titanium Dioxide 4.0%; Inactive Ingredients: Alumina, Butylene Glycol, Calcium Carbonate, Caprylyl Glycol, Cetyl PEG/PPG 10/1 Dimethicone, Cyclopentasiloxane, Dimethicone, Ethylhexyl Palmitate, Ethylhexylglycerin, Glycerin, Glyceryl Behenate, Glyceryl Dibehenate, Gossypium Herbaceum (Cotton), Hexyl Laurate, Hexylene Glycol, Hydrogenated Polyisobutene, Lycium Barbarum Fruit Extract, Magnesium Sulfate, Mica, Microcrystalline Wax, PEG-10 Dimethicone, Pentaerythrityl, Tetraisostearate, Phenoxyethanol, Polyethylacrylate, Polyglyceryl-3 Beeswax, Polyglyceryl-3 Polyricinoleate, Polyglyceryl-4 Isostearate, Potassium Sorbate, Propylene Carbonate, Quaternium-90, Bentonite, Silica, Silica Dimethyl Silylate, Sodium Benzoate, Sodium Chloride, Sodium Hyaluronate, Stearic Acid, Tribehenin, Triethoxylcaprylylsilane, Water. May Contain (+/): Iron Oxides (CI 77491), Iron Oxides (CI 77492), Iron Oxides (CI 77499), Titanium Dioxide (CI 77891).
Do note the high amounts of silicone in the product, if you are sensitive. Also note that Hyaluronic acid is very far down the list of ingredients, as well as water. This explains the dry, paste-like texture. Yet, for me, it works very well but as I said, I do prefer light bases like this 🙂
Have you tried this Hourglass Skin Tint?
I didn’t, the first few times I used it. I thought it was a very expensive mistake! But now, I can’t stop using it and practically use it everyday! It’s perfect for the barely there makeup look I favour these days. Love! 😀
Paris B

I do like the Hourglass Skin Tint. Like you, I had to find the best way to work with it. And, like you, I use my fingers. It really does melt into the skin. I don’t find it to be drying or moisturizing. I only put a tiny bit of setting powder on my nose. I prefer a cream blush. As long as I keep my hands away from my face it lasts. Personally I think I get medium coverage. On a whim I tried to build it to full coverage. It was a colossal failure. It is wonderful in the Florida heat and humidity. It is definitely not heavy or occlusive.
Hi Jan, yay! Glad to meet someone else who enjoys using this product! 😀 I haven’t tried building it up to full coverage, but I’ll definitely bear your warning in mind. I think it probably gets too thick and goopy when built up. But as a thin layer over the skin, it’s lovely, and we probably have a similar sort of climate too!
This looks so nice on you. Love the natural glow esp on the photo before powder was applied. I can totally see myself using this and loving it. So sheer and natural and yet provide sufficient coverage to minimize skin’s imperfections.
The consolation about this being a thick paste is how it would last forever. Ha Ha. Great value I suppose. 🙂
Yes, I love that gentle glow on the skin and yes, it will likely last forever LOL! 😀 The only real drawback with this product is the paste-like texture that can dry quite quickly, so it’s quite essential to work quickly.
I’ve always been very curious of this so called tinted moisturiser… I think the name makes me think good things, *hyaluronic skin tint*, yes please! And I happened to get my hands on some samples in the colour ‘Ivory’. The colour first and foremost oxidises. I HATE that. I could work with the texture, but for $80 dollars here in Aus, what’s the point. So I gave up lol
So sorry to hear you didn’t have as positive an experience with this as I did Sylvia 🙁 But thank you for sharing. It will help someone else who might be wondering if it will oxidise 🙂 And yes, it’s incredibly expensive. I’m glad it works for me, but I’m even more glad you worked it out that it didn’t work out for you from a Sample!
Thanks for this commentary! I bought the Vanilla Illusion online and have had exactly the same reaction you did when you first put it away.. I thought it is too thick and pasty – basically too hard to apply and looks heavy on the skin. But hearing about how you managed to convert it into a great product with a few easy techniques, I’ve decided to give it another try using much less, and moisturising much more before use. Thanks again! Hopefully I’ll end up using this very expensive product and loving it as you do now!
Hi Pam, I hope you’ve continued to enjoy using the Hourglass Illusion! I still enjoy it, but it does need a bit of work haha 🙂