Contrary indeed, for it seems I have taken up a new hobby – gardening! Yes, this brown thumbed gal, who is usually found burying plants instead of growing them, is now getting her hands good and dirty in the soil, and slowly but surely learning to grow plants. I know this isn’t conventional for a beauty blogger, but I think you know by now that I’m not very conventional to start.
While it all sounds fascinating and rustic, in actual fact, I have nary a patch of green in sight, and what I’m doing is trying to grow an edible balcony garden, right here in the middle of Kuala Lumpur city.
I mentioned this new interest of mine a couple of weeks ago, when I showed you my early attempts at growing herbs. I’m still sticking with herbs for now, as that’s were my interests currently lie. I’m attempting vegetables next month so that will be an even more interesting endeavour!
I wrote this post primarily because people on Snapchat and Instagram (both at parisbmws) have been asking me about how I grow my basil plants, and it was really too long to explain on a social media platform like that, so I decided to blog about it. If this isn’t something that might interest you, please feel free not to read, but if you too are a budding, or a full-fledged gardener, or you too have taken up balcony gardening, I’d love to learn some tips from you! 🙂
Growing Thai Basil from Shoots in a balcony garden
My attempt at growing Thai Basil or Asian Basil was primarily due to a simple reason – greed LOL! 😀
I love cooking and eating Thai Basil Chicken/Pork (pad kra pao) and the most important ingredient that makes (or breaks) the dish is the basil. While it’s relatively easy to find and buy it locally, I decided one day to see if I could grow it, so I have easy access to the leaves. Happily, these days, there are loads of videos and blogs and websites that teach you simple things like this, so I found a lot of resources online!
When I bought a bunch of Thai Basil one day, I picked out some of the healthier looking shoots and decided to see how far I could take them.
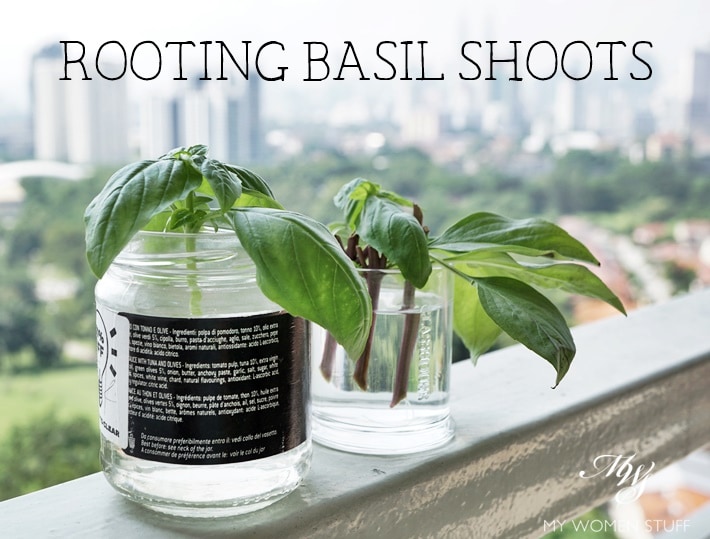
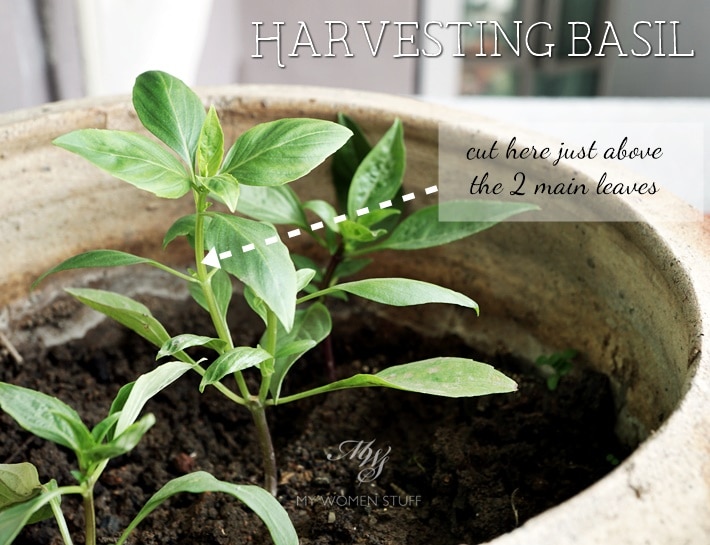
From what I read online, you are supposed to get some shoots just where the leaves start to branch. You will notice this, from the plant itself. There are 2 main leaves. Snip off the top of the plant just above these 2 leaves. But later, I learned through trial and error, that you might want to leave some of the top leaves on as well, as it speeds up the process. More leaves = easier for the plant to make food = faster growth.
When you buy the plants from the market or supermarket, the bottom part of the stem maybe dry, so snip it off, and then stick the plant into a small jar of water. Be sure to only submerge the stem, leave the leaves dry. This is very important, as basil leaves are very sensitive and the plant will die.
Change the water daily. If not, it will likely die.
I learned this all the hard way 😛
After about 7-9 days, this is what you may notice.
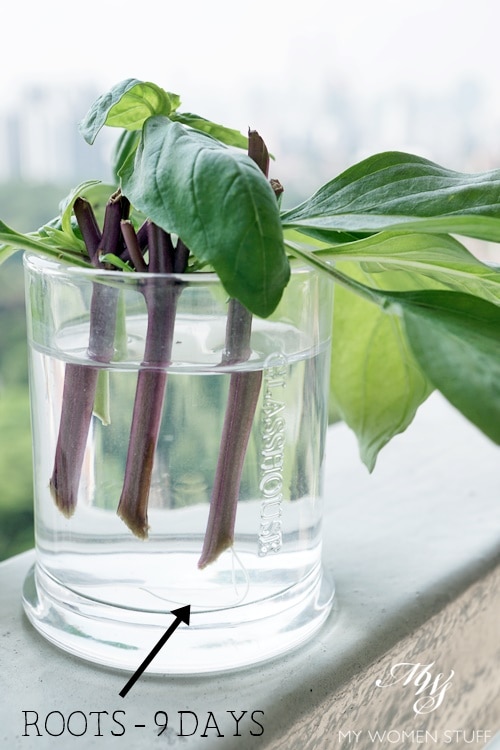
ROOTS! These fine white roots will have started growing from the base of the stem where you cut it. I like to leave it till there are more roots before planting them in soil, as I feel it makes them stronger. Naturally, I learned this through trial and error as well. The first time, I was so excited to see roots, I stuck it into soil immediately and the plant… died. You see the trend? 😛
Once you see more roots appearing (sometimes they get feathery) then you can prep a small pot (Check out Daiso for some very affordable planters of various sizes, or Ace Hardware, if you’re a city girl like I am. I haven’t had the chance to check out a garden centre/nursery yet, but I plan to soon). You can also repurpose some plastic containers you have lying around – just poke some holes in the bottom for drainage and you have a pot!
I had some pots with garden soil in them that previously housed plants that I killed with my superpower so not knowing better, I planted my seedlings straight into the damp soil. This is a mistake as I soon learned. Going from a water medium, where the plant is so used to having lots of water, into soil where they have to work for their water can be hard on the plant, and yes… they can die. Spot the trend 😛
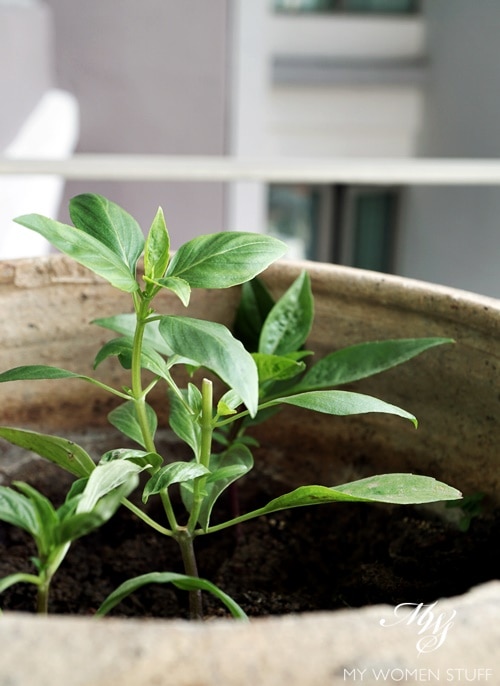
Happily for me, my latest experiment with the Thai Basil plant was the most successful. It was touch and go for a while, but with lots of care, sunlight and water, the plant started growing. Once the new leaves came in, the plant got stronger day by day. And here’s what it looks like now – my basil that started with just 2 leaves!
So, as I was telling you, garden soil in a pot isn’t what you should be using. It’s heavy and it may not offer sufficient drainage for your plant. It works in a garden, but not on a balcony. What you should do is get potting mix from a garden centre, nursery or Ace Hardware. I got some recently, and it’s a lighter mix of soil and compost, and is better for container-bound plants i.e. balcony gardens. I’ll experiment with that and let you know 😉
Once the basil’s growth kicked in, it grew quite easily, and then came the time to harvest. I turned once again to the almighty Google to see how I should be doing it.
The trick is not to pluck the leaves. Left to me, I’d have plucked the larger, older leaves. But that’s not how to harvest your basil – any species of basil for that matter!
Basil grows in tiers, with 2 leaves in every tier. What you want to do is snip off the plant right above where you see the 2 main leaves. New leaves and shoots will grow from the side, and this not only encourages growth, it makes the plant more bushy as well. My plant is growing a little slowly so I’ve only harvested it once so far – not quite sufficient for a pad kra pow dish, but enough to toss into some hot pasta and it was delicious! 😀
Alternative method to grow basil from shoots
An alternative I also tried, was to stick the cut stems straight into the earth and hope for the best. It was again, touch and go for a while, but after a week of praying hard, I noticed the plant was growing new leaves. That’s a sign that it’s rooted and starting to grow. True enough, I dug it out to have a look and there were some roots! So, if you don’t want to try the water method, you can try this too.
I’ll have you know that it wasn’t always smooth-sailing. Everyone tells me “Oh basil, it’s super easy to grow! Just stick it in the soil!” No, that didn’t work for me.
Or “It’s easy! Just leave in water, it’ll grow like a weed!” Nope, didn’t work for me either!
Instead, this is what truly worked for me, that I’m going to share so you can try it for yourself, or just see if you experienced the same.
- Rooting the shoots in water for about 2 weeks to get more and longer roots, before transplanting. If you need more time, take more time. The idea is to get the plant to grow longer roots before putting it into the earth.
- Root your shoots in a shady area and be sure to submerge only the stems without allowing the leaves to get wet. I put them in my yard area which doesn’t get the sun but gets some light.
- When you transplant them into soil, be sure to monitor the water. Growing plants need water. But don’t flood the plant. Too much water kills it. You can transition the plant by adding soil to the water little by little day by day, until it’s stronger, then transplant it into a pot.
- Once it’s in a pot, basil plants need sunlight so place your pot in a sunny part of your house. My balcony gets the morning sun which is perfect as it isn’t too hot. By noon, the direct sun is gone. If you are growing it indoors, be sure to place your pot near a sunny window for a few hours everyday. Plants need the sun to grow their food. After that, move it to the shade so it doesn’t dry out.
So, that’s how I grow my basil and I’m now experimenting also with some Italian Sweet Basil I bought. I bought a plant from a store, and I’m trying to root new plants, and hopefully have enough to make pesto some day! 😀
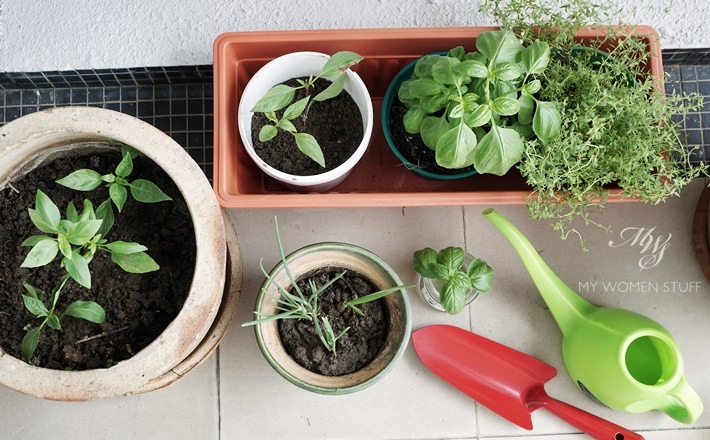
For now, this is my little herb garden in a corner of my balcony. When it rains, I move them further out, so they get some rain water. I’m told plants like rain water, and it saves me the watering LOL! 😀 Thus far, I’ve got some straggly spring onions, Thai Basil, Italian Sweet Basil and some Thyme. The latter 2 are new, so I hope to keep them alive. I’m working on vegetables next month, and you know what?
I never thought I’d say this, but I’m loving it! There’s something magical about watching your plants grow and come to life and stay alive 🙂
Do you have a balcony garden? Do you like growing things?
I never enjoyed it before, because I found myself killing things through neglect. But when I pushed myself, I realised that I could grow things, I just had to learn how to do it properly. And I’m only interested to grow things that I can eat so an edible balcony garden works for me. If it was flowers, they’d be dead by now LOL! 😀 Have you successfully grown an edible garden or balcony garden? Any tips to share? 😀
Paris B

am proud of u my child! I love admiring plants 😀 but of course….my parents’ mini plantation XD
now since i have bought a small pot of basil, hope I can keep it alive ^_^v #peerpressure you should try planting okra too!
LOL Good luck with the basil and you know where to get more if you need it! 😛 I’m not sure about planting okra – i remember it’s not terribly easy. But I’ll have to wait for veg – needs too much care!
I loved reading this post! I swear, people can’t tell me I’m not an optimist at heart because I continue to try to garden despite several failed attempts in the past. Making it even tougher now, I’m attempting this on our apartment’s patio in containers. But somehow I’ve managed to keep my herbs and cherry tomatoes alive. The big test is coming up as we have summers here that can have a bunch of consecutive days that are over 95 degrees. Crossing my fingers.
By the way, if you want to try a touch of flowers in your garden, consider nasturtiums. Both the leaves and blossoms are edible!
Thank you Blanca! Like you, I keep trying to tell myself that I can do this – I just need to pay a little more attention! I hope your plants grow well. I’m going to attempt cherry tomatoes too, which I hear are a challenge as well. Hope your plants pull through summer and thanks for the edible flowers tip!
Ooh yes ! I’d planted yellow cherry tomato on my balcony and ate the fruits. They taste sweeter when I grow them myself. But I didn’t ask the Google or Youtube teacher when to harvest. I left them too long on the plant that in the end some tomatoes cracked. But they were still tasty, fresh from the plant 😀
Another easy plant is aloe vera, the edible type. If you like aloe vera dessert (tong sui) then you might wanna plant one. My balcony gets 3 mths of sunlight 2 times a year. Now it’s in shade so my aloe vera is not as fat and thick as those sold at market.
I always find people with no ground available (apartments or those who intentionally cemented the ground around their houses) and still able to find ways to grow plants are impressive. I think we need to learn having lots of patience and not giving up when growing plants. Lots of experiments and googling, too LOL
My house is one storey with lots of ground around the house so I’m not familiar with planting only with pots. We do have pots but we also plant our plants on the ground. I think if you want to try fruit next, best don’t try durian or mango unless you can find bonsai-version 😛
To be honest, I’m more of a girl who water the plants and once, a girl to uproot unwanted, poisonous plants – more of a girl with brawn and keep on moving if I’m needed to help with the plants hehe. I leave the actual gardening to my parents as they have green thumbs while mine are blue thumbs (for watering purpose haha).
I have one dream plant if I ever grow something: roses because they reminds me of my late grandma.
When I lived on the ground, my gardening skill was growing lalang. LOL! But you are right, plants need a lot of patience – like with handling people. The only good thing is they don’t piss you off the way people do LOL! I saw some pictures of people growing bonsai apples and pears. Not something I’d try any time soon. Bonsai isn’t my forte haha! Roses are beautiful plants to have, but I find the lowland roses don’t smell as nice, and don’t bloom as prettily, due to the heat. It’s such a pity, because they are lovely flowers to admire.
This is such a joy to read! In my pre-Coco days, I’d successfully grown strawberries, snow peas, lettuce, cherry tomatoes, crazy amount of herb, plum tree, roses, magnolia. Then the canine came along.
Just a word on basil as well they are not as easy to grow as everyone says. I accidentally left mine out overnight this winter and it was a particularly frosty night/morning (sub zero) RIP.
My rosemary and parsley plants are doing well. Chilli is getting there. Winter is harsh on them 🙁
Also, keep the water from washing your rice, the plants love them.
Wah, pre-coco you were practically a farmer! LOL! Too bad she put paid to all that 😀 I tried planting thyme, but I think it’s just RIPed. It’s been raining a lot, and apparently they don’t like water, so my plant has just curled up and died. Sigh… Thanks for the tip re: rice washing water. I’ll be sure to keep them aside!
Onions, garlic, lemon grass, thyme and mint are sitting on my balcony 🙂
Will try the Thai basil next!
Do you live in Malaysia, Ange and if you do, how did you get Thyme to survive?! I think my plant just died and I suspect it was from too much rain!
Oooh I really have to try the growing from water way. I’ve tried growing basil for years and none of them lived past a few weeks. Mint and parsley grew like weeds though. 😛
I’m going to attempt mint and parsley some day. I dare not think of how easy they are, as everyone says, since I have such bad luck with plants haha! but yes, basil. They need a lot of TLC! Maybe try in the Spring, or if in Winter, grow them in water and keep them in a sunny part of the house 🙂
Hehe. Thanks for this post. Now I’m itching to grow some basil and mint!
Not hard! And makes life easier for your cocktails 😛