If there’s one thing I particularly love about blogging and what I do, is the incredible opportunities I’ve had to meet with, talk to, and pick the brains of makeup artists, skincare founders and experts in the industry. It never gets old for me, and there’s always something new to learn.
It’s no secret that I love prying behind and digging deep into the different aspects of beauty, makeup and skincare, and I love it when some brands recognise that and give me the opportunity to do so (for better or for worse).
Recently, during the official launch of the new Bobbi Brown store at Pavilion KL (now on the 3rd Floor) I had the opportunity to catch up with one of my favourite makeup artists out there – Felix Nguyen, Regional Education & Artistry Manager of Bobbi Brown Asia-Pacific, who I unfortunately ambushed with a few hard questions about the brand. Oops! To his credit, he didn’t get flustered, and was quite open to share. The other pro makeup artist I love is Junior Cedeño of Dior, who single-handedly changed and cemented my foundation application technique for life.
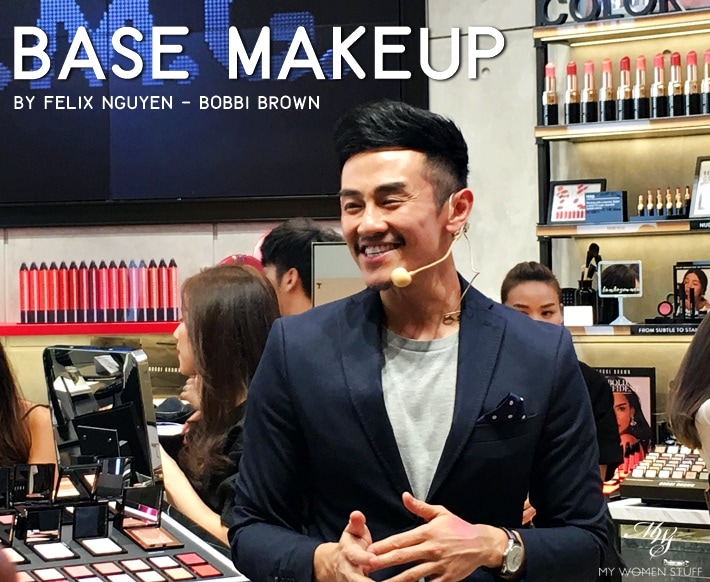
It helps that they’re both hot (eye-candy helps you concentrate 😛 ). Unlike many makeup artists I’ve met, who are a little more distant and sometimes more aloof, Felix is friendly, and as generous with his makeup and skincare tips as he is with his boyish grins. Ok, I promise I’ll stop simpering after this 😛
So, while I was there, Felix did a little base makeup demonstration and I love learning new things about base makeup, so I was taking down copious notes. Since some of you on Instagram were so kind to compliment me on my generosity with sharing knowledge, I decided I’d be generous again this time. Ahem 😛
But here’s the rub. As a friend and I observed, while being back-benchers for the day, hiding behind the crowd who were there, mostly to get up close with the cute makeup artist (oops! there I go again!), the model had great skin to start with. Naturally, the thin layers of makeup, as Felix was explaining should be used, combined with his expert skills, would render her flawless without too much effort. How about picking one of us mortals, who have blemishes and all, instead? 😛
I was thinking about that, as I was writing up my post about the base makeup tips I’d picked up. So I decided I’d do you a step-by-step, to show you how he demonstrated how you can get a flawless base, but I’d use me – imperfections and all, and my rudimentary non-makeup artist skills. I really wanted to see if his tips would work for those of us at home, so I only attempted this once as you see here – without a lot of expectations 😀 It could have gone remarkably wrong.
Except of course, as you’ll see, it didn’t go wrong and I surprised myself!

For this purpose, I wanted to show you that while Felix used Bobbi Brown products (naturally), you can use anything you already own. Will BB like me saying this? I don’t think so, but I’ll say it anyway 😛 Also, even if you’re not a makeup artist, like me, you too can do this! 🙂
So, first thing I did was get everything I needed in one place:-
- A corrector (optional to be honest) – Bobbi Brown Intensive Serum Corrector
- A concealer – Nars Radiant Creamy Concealer
- A light-medium liquid foundation – EX1 Invisiwear Liquid Foundation
- A stick foundation (optional) – Bobbi Brown Stick Foundation
- A pressed or loose powder – Bourjois Healthy Balance Unifying Powder
- 2 brushes – 1 foundation brush, 1 powder brush
It looks like a lot of products, but you only use very little of each. The trick is really, layers. Thin layers, for a natural, flawless finish. Incidentally, it fits my current motto of makeup application so I was already doing something similar, except I’m not as clever to execute it as cleverly as a professional makeup artist does 😛
TIP 1 – PREP YOUR SKIN
First thing that Felix recommends is that beautiful makeup starts with beautiful skin. So, be sure you prep your skin with skincare properly. He recommends a drop or two of facial oil, massaged into the skin, which he says, helps makeup sit better. Dry skinned gals, take note because this might be a game changer. I used to blend a drop or two of oil into my foundation – the glow is beautiful and it actually helps your makeup stay on better too. Ironic, I know. But hey, whatever works! 🙂
TIP 2 – CORRECT AND CONCEAL
According to Felix, if you don’t feel like having a lot of makeup on, sometimes, a corrector and/or concealer is all you need, just to take away the tiredness, especially from around the eye area. So, start with a corrector to neutralize the redness and dark eye circles, and then a concealer that acts as a bit of a highlight and to cover.
I personally don’t use a corrector. Bobbi Brown is known for their correctors, but I find it an unnecessary extra step. That said, when I DO use a corrector, it often makes a difference. But I’m just too lazy – not ashamed to say so 😛 I tested this out using the Bobbi Brown Intensive Serum Corrector in Bisque. I feel it to be a bit more peachy than I like and I’d call it and say it’s optional. BUT if you use this technique, it can be an essential step.
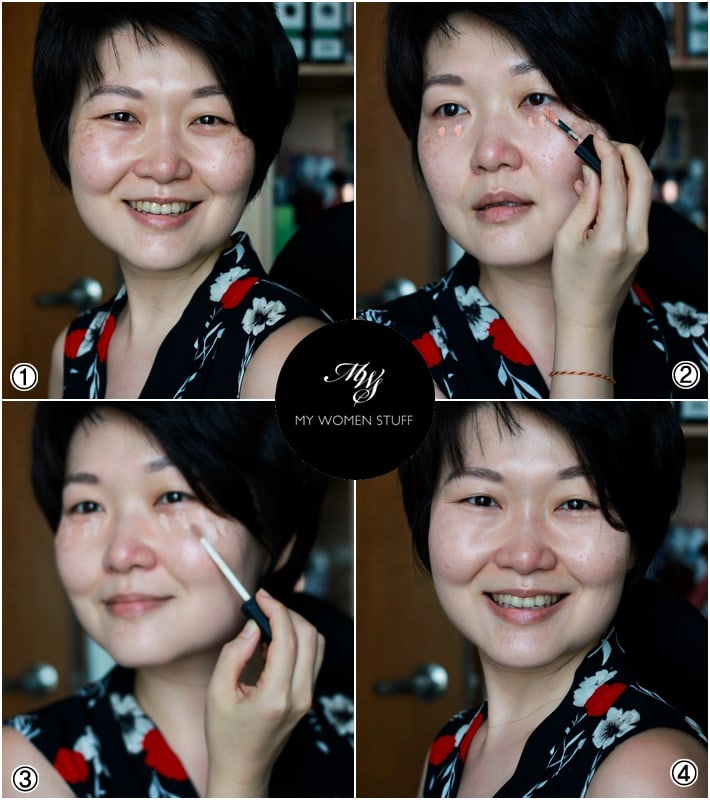
- That’s me, bare skinned with just my usual skincare and sunscreen. By no means am I model material, which is why I had to see how effective this technique was.
- Dot corrector under the eyes, then use your fingers to blend out, patting into skin. I used the Bobbi Brown Intensive Serum Corrector in Bisque.
- Then, dot on concealer where you need it. I used my favourite NARS Radiant Creamy Concealer in Vanilla on the under-eye area and along the tops of my cheeks, and then blend it out with fingers. Pardon the out of focus shot – I only realised it after I was prepping these photos and couldn’t be arsed to take another shot. You get the idea.
- That’s just with corrector and concealer around the undereye area and along my cheeks. Ok, Felix was right. I could be quite happy to just live with this on a no-makeup day, with a dusting of powder.
TIP 3 – FOUNDATION
For the rest of the face, Felix suggests that you use less foundation, for a more natural appearance of skin. You don’t want to mask your skin. So, use a light-medium liquid foundation (he used the Bobbi Brown Skin Foundation), squirted onto the back of your hand, and then use a foundation brush, blending it on the back of your hand, working the product into the brush to give you better coverage.
Felix also used a flat paddle brush, but I detest flat paddle brushes so I used the Real Techniques Expert Face Brush instead for this purpose.
PRO TIP: If your foundation is streaky, or you see foundation lines or brush strokes on your skin,you likely have too much foundation on your skin or too much on your brush. Wipe off the excess and then blend it out.
Now, apply the foundation, starting where you need it most. This is usually in the middle of your face, blending outwards to your hairline.

You may notice that it’s the center of your face that sometimes has the redness, around the nose and cheeks. Applying foundation in this area also “lifts” the complexion, and gives the appearance of a highlight. You also usually need less product around the sides of your face. If you use the same quantity all over your face, it looks flat.
You’d be surprised that using this tip of working the foundation into the brush before applying, I actually used very little foundation! It was just about half a pump, and I used the EX1 Invisiwear Liquid Foundation in this demonstration.
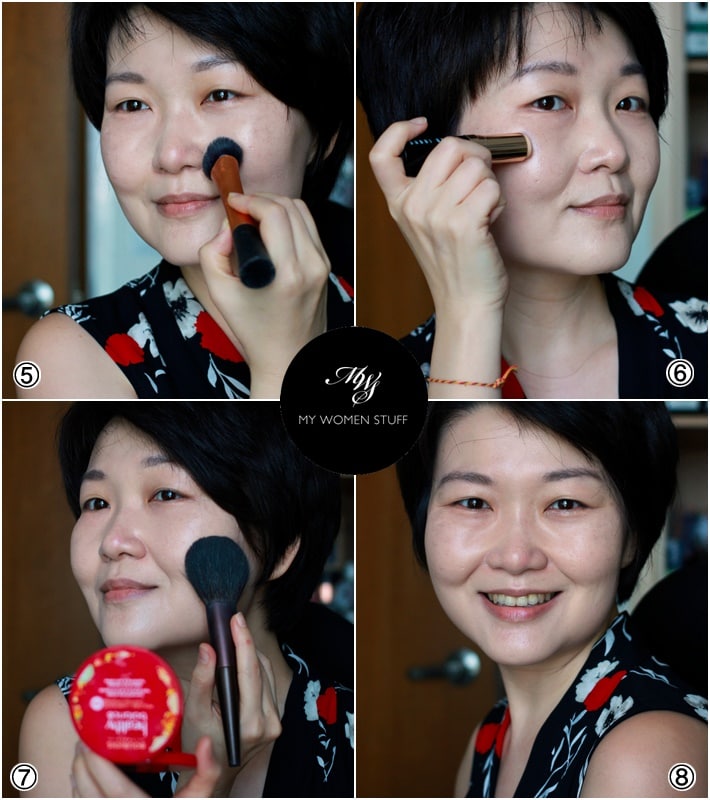
- Apply liquid foundation where you need it, starting from the middle of your face and working your way outward to the sides and hairline. Don’t forget to work it into your hairline or you can risk looking like you’re wearing a mask.
- Next, if you desire better coverage, use a stick foundation (Bobbi Brown Skin Foundation Stick ) and dot it where you need it, or use a brush to pick up the product and then apply to your skin and BLEND. Trick is SHEER LAYERS. I applied just a little to the tops of my cheeks and blended it out. While I initially thought this was overkill, I was surprised at how it made the base more flawless, without my having to use more product than necessary. This is of course, an optional step.
- Next, load up your powder brush with some powder (I used the Bourjois Healthy Balance powder), tap off excess (ALWAYS tap off excess) and then apply it only to where you need it. Again, this is usually on the centre of your face, where you may tend to oil up. PRESS your brush into your skin, instead of brushing it on. This helps the powder adhere to your skin better, and you can touch up as the day goes on, instead of looking cakey.
- And I’m done! I made sure I only use thin layers and the techniques Felix talked about, and I have to say that the end result did rather surprise me. While I’m still not model material, and I’m no makeup artist, my skin does look much better than it did without any base on.
Here’s the side-by-side comparison of how it looks before and after so we know I’m not just talking through my hat.
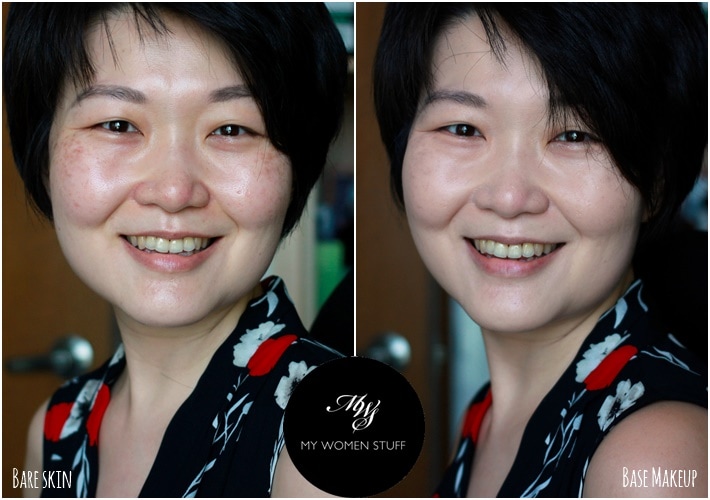
Not bad right? I guess the tips did work after all, even on non-perfect looking skin and executed by an amateur! 😀
The trick here is to use thin layers, and build it up. This way, your base makeup won’t crack and your skin still looks natural. It doesn’t take as much time as you took to read this post and is quite quick in fact, once you have everything on hand. I find the finish more elegant yet very natural as compared to my usual technique so I really like how it looks! 🙂
Did you find these base makeup tips useful? Will you try it?
While it won’t take the place of my 5-line foundation technique, and I do still prefer applying my concealer AFTER foundation, it is something I’ll be keeping on hand because this one seems to help my base last better too 😀 Do let me know if you try this – I’d love to know how well (or not) it worked out for you 🙂
Paris B

Paris, this was worth the read. Over the years i find less makeup is the better way to go. Although i would rather slap on some sunscreen and loose powder, on days when my undereye bags look the worse, a peach corrector would work. In your picture of the before and after there was significant brightening under the eye for me to want to invest in a corrector..haha. by the way Paris, would there be any chance of you doing a blog post of retinol products. Been using Kate Somerville retasphere lately and its been working a charm but i here there are others like dr.brandt and others which i have yet to come across available in Malaysia. Hope to hear from you soon. Hugs.
Glad you enjoyed this Arfah! 🙂 I actually think that the brightening is mostly attributed to the concealer (Nars) than the corrector LOL! But if you find the right one, I’ve seen it work magic on dark eye circles. As for retinol products, thanks for the suggestion. While I know it’s a big thing right now, and a key anti-aging ingredient, I actually am very new to the use of retinol and retinoids. It’s just that I haven’t really used any that have truly wowed me just yet so I don’t feel qualified enough to talk about them in detail. I have a bottle of Dr. Brandt glow overnight something, which my friends have told me is THE BOMB and I bought it, but I haven’t used it yet. I really should, but I’m giving The Ordinary a chance first and see how that goes. Perhaps in future, i might have a better idea of what works and what doesn’t, but for now, I’m not your best source of info, sorry! That said, I’m glad to know that the Kate Somerville works well for you!
My burning question as always is how long does it last though? Looking perfect for the first 10 minutes after you finish applying is great but I’d be much more impressed if it still looks perfect at the 8 hour mark. Or even at the 4 hour mark.
Lasts me longer than my usual way of applying foundation 🙂 That said, I have normal-dry skin so foundation doesn’t really slip unless it’s late afternoon or evening or I’ve been out in the sun. I’ve found that to have it actually looking perfect from morning to evening, using a primer and a longlasting foundation or one like my HG Cle de Peau foundation is a no-fail formula. So, it’s partly technique and partly products you use 🙂
The last paragraph regarding concealer after foundation or vice versa is the biggest paradox of makeup. I can never guess which will be the correct technique, there is no logical explanation for both.
I use this rule of thumb – If a foundation is a medium-high coverage foundation, I apply foundation first, and then touch up where I need with concealer because my foundation should do the job. This is also why I usually apply my foundation first, not concealer (although we are often told to do the latter). With light coverage foundation or BB/CC creams, I sometimes go with concealer first, because they offer less coverage and the layering over the concealer helps with coverage. But it also works vice versa as I do both, with slightly different results. Just go with whichever works for you – no rules in makeup! 🙂
Yeah, you nailed it. I do agree it’s all depending on coverage. Medium to high coverage foundation could be able to hide most flaws except for major bums. That’s when concealer is needed.
Yep, which is why people who pile on the foundation AND the concealer look fake. Rather, they may look nice in photos, but fake in real life
I am one who hates foundation and uses it only when I absolutely have to. Usually, I would just do my skincare routine (toner and moisturiser), do my brows and smack on some eyeliner and I’m ready to go!
But on days where I feel slightly less sloth-like, I usually do the skincare routine and apply Sulwhasoo’s Makeup Balancer in light pink on my whole face and go on with the brows and liner. However, with the makeup balancer, I usually put Innisfree Loose Mineral Powder or else it’ll get a very oily effect on my face.
I am definitely excited to try out your methods though when I finally put on a full-face of makeup again! And maybe try out the corrector method tomorrow on just my undereyes. I’ll keep you updated if there’s a difference hehe
Cheers!
Ah to have good skin! 😀 But I would usually only this for work or something more important. On other days, I go with a much lighter base and some concealer just to even things out, and a bit of powder. Gotten my routine down to a fast science now 😀 But if you do try it, I hope it’ll work for you! 😀
Wow! :O I really love the effect after using the technique you learned! Your skin indeed looks flawless, natural and glowy 🙂 I learned the technique to put foundation on and start blending outwards from the inside of the face when I was watching Korean beauty videos and somehow it just became a habit of mine to do so. However, I did not know that just by putting on concealer under the eyes can brighten the complexion so much and makes the face look brighter and more put together. Thank you for sharing all these tips and tricks! It is definitely very useful, especially for me since I prefer light and natural makeup looks. Really love reading your posts as they are always so informative! 🙂
Yep, less is so much more! I found I used so little product, and it was all the light layering that really did the job. Oh and concealer. I can’t live without it – no thanks, dark eye circles! LOL I’m glad you found this useful one way or another. I always like trying something new for foundation application – never know when I might hit on the next easy thing! 😀
The motion and pressure is important. Each of us have different level of strength (that’s the appropriate term, I suppose. Or is it pressure?). I learn that for different skin type, each makeup application (or even makeup base application) is different. I love this tutorial. Easy and simple to follow. Thanks for sharing, PB.
You’re welcome Angelina 🙂 Yes, pressure is important to get the product to adhere to the skin, hence the patting motion. And there are so many techniques out there, some of which work and some don’t. I for example, never got the hang of using a sponge to apply foundation, nor the paddle brush. So I think we should work within our comfort zones, and tweak techniques accordingly 😀
I think that I never got your 5 lines method, I simply couldn’t make it work in a way I like. But this one seems to be a better option for me.
In my opinion applying concealer before or after foundation depends of the products you’re using. For example I use most of the time a tinted moisturizer and L’Oréal Promatte foundation as a concealer, since the latter is matte and the other is more of a satin-natural finish I need to conceal before in order to avoid getting matte patches on my skin. This also works when your base product is sheer because adding concealer before and then the base product makes everything more blended.
Also I’m of the idea that if you’re using a medium to full coverage foundation there’s no reason to apply concealer before foundation because the foundation covers almost everything so you’ll only need concealer in very few places.
Unless you’re color correcting that in my opinion goes always before foundation or concealer (I don’t agree with Sir John in that point, he says it’s better to color correct over foundation).
Now a rant: I hate those videos where they use a lot of foundation and then concealer, the last one I saw was from Nikkie tutorials and she was blaming the silicone applicator of getting her foundation too matte, it was Lancome Teint idole ultra which is ultra matte and heavy coverage so if your applicator doesn’t “eat” foundation you’ll end with all over your face.
Now I feel free.
Haha thanks for being honest Efrain! I love the 5 line method, but I totally get it that it doesn’t work for everyone 😀 I have the same opinion as you with regards when to apply concealer. I sometimes find that if I apply concealer first and then happen to apply a heavier coverage foundation, it can look too heavy, and I don’t like that. In that situation, I can sometimes skip concealer. Oh I hear you about the video tutorials that trowel on foundation like it’s going out of fashion! There really is absolutely no need nor any excuse to use that much. And then they use concealer that’s 2 shade too light, and draw these huge triangles on their face etc, and really. It’s so unnecessary, and worst of all, those who watch or follow, do that in real life. Sigh. Foundation isn’t there to hide our faces, it’s just to help enhance what we already have, and if our skin is bad, well, there’s no getting around that!
Hi,nice techniques, but is there corrector from the drugstore that is available? Can’t seem to find any.
Hi Wan, I don’t know of many, but I think Catrice and NYX do a corrector palette with a few different shades e.g. peach, green, lilac etc, that are quite affordable. I haven’t used them before so I can’t vouch for them
I have tiny dark spots on both cheeks and nose.i use LAKME CC cream .Do i need to use a concealer also?
It depends on how much you want to cover your dark spots. If you do, then yes, a concealer will help.