I love learning new and different ways to apply my foundation base. I used to use my fingers a lot, and when I was taught the super quick way of using my palm to spread the foundation on my skin, I was sold. I used this method for a long time, until I came upon the Perfect Foundation Brush. Then, it was brushes all the way for me.
I’ve shared a few Makeup Artist tips for applying foundation (Clinique, Lunasol, Estee Lauder, Dior) but here’s one from a Dior Pro-team International Makeup Artist that I just have to share by way of a tutorial, because not only is it fast, its easy and error free and importantly, gives me a beautiful base every single time 😀 Makeup Artist to the stars, Junior Cedeño applied this for me, using the Diorsnow BB Creme but I’ve since tried it with BB Cream and liquid foundation, and it works very well for both.
This is now my go-to method for applying base and if you can draw lines (doesn’t even have to be straight lines!), you will love it too! 😀
Here’s what you’ll need:-
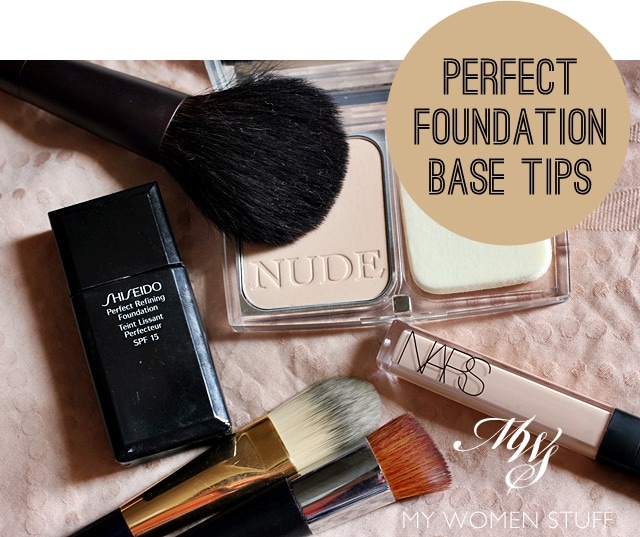
- A foundation brush – doesn’t matter of its paddle brush or flat top brush (Shown in picture Estee Lauder flat foundation brush and Dior Backstage Full Coverage flat top brush)
- A powder brush – Shown in picture Lunasol Face Brush
- Your favourite liquid foundation – shown in picture Shiseido Perfect Refining Liquid Foundation I00 Very Light Ivory
- Your favourite concealer (if needed) – shown in picture Nars Radiant Creamy Concealer in Vanilla
- Your favourite powder foundation – shown in picture Diorskin Nude Powder Compact foundation 010 Ivory
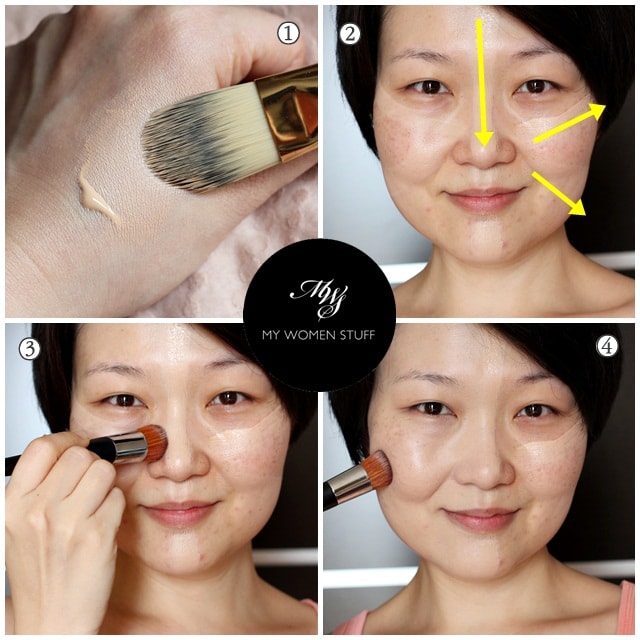
- Pump your liquid foundation on the back of your hand. Use your favourite foundation brush, spread out the foundation with the brush, loading it up on the bristles. I’ve tried with the regular paddle brush or the round flat top brushes and they both work. Junior used the paddle brush so I show you a paddle brush but I usually use the flat top because its just quicker.
- Using the brush, draw 1 thick line straight down the centre of your face from forehead to chin. You should always start applying your foundation from the centre of your face outwards. This is also what we learnt from the makeup artist from Lunasol earlier. Junior just made it easier to put into practice. Pick up more product and draw a line on your cheeks from your nose outwards to your cheekbones. Repeat on the other side of your face. Draw in a line from nose to jawline. I drew in arrows to make it easier 😀
- Now, blend the product outwards from the centre of your face towards the sides. You will find it very easy to do, and you’ll spread out the product thinly enough so it’ll look natural. Most of the product will be on the middle of your face, which also gives the illusion of light and thus, makes the middle of your face look more prominent. The sides of your face usually need less product. Junior’s tip was that this gives the most natural look to your skin as the products go just where they should, and when working with a base, you want to look as natural as possible.
- You can probably see from this picture how the blended half looks as opposed to the unblended half. This is one of my favourite liquid foundations and its very easy to work with and coverage is pretty good too.
- Here’s what it looks like after you’re done with just your foundation. Naturally, the effect will depend on the foundation you use but you will generally find that your skintone is more even and the effect is very natural because you don’t over use product on your skin.
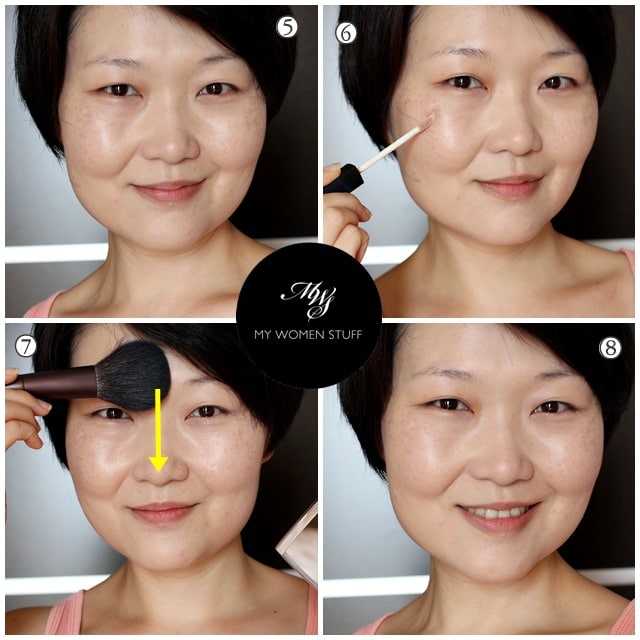
- Touch up concealer where you need it e.g. undereye, blemishes etc. Junior used a bit more foundation for a more transparent, natural look; or he said you can also use a concealer for more coverage. I used a concealer because its faster for me.
- Take a fluffy powder brush, lightly pick up some powder foundation or setting powder and lightly apply on the centre of your face – forehead, nose, chin – and blend to the sides. Again, follow the arrow. For a natural finish, Junior’s advice was not to apply loose powder all over as it can look too matte and too flat. Apply only on the centre where you will oil up first, and this will hold everything in place.
- That’s it, you’re done! Now admire your flawless self 😀
I have tried this with various liquid foundations and it works. How sheer or how full the coverage is depends on your foundation. This method also ensures you do not over apply product and that you use just enough for your face. Generally, 1 pump of foundation suffices every time, and you don’t end up overdoing certain areas of your face that may not need the foundation at all. There were some foundations I found patchy before but now, they are a breeze to apply!
What I like is that by using this method, I now have a more even finish and its surprisingly fast! Doesn’t even take me 5 minutes to sort out my base makeup and I’m always left with a beautiful finish each time. This is a backstage tip and you know how fast they have to work backstage for fashion shows, so they have no time to waste. This stripey method was quick, efficient and effective.
The trick with using a powder foundation to set just the middle bit of your face was quite a genius idea too. I found that it did help control oil better, and my foundation did not fade off as quickly as they sometimes do. You know how it is when you find your nose turning shiny by day’s end and your base gone? This helps to prevent that. Of course, if your foundation does not suit your skin or turns it oily and slips off then it won’t help. This assumes that you are already using a foundation that suits your skin – its not magic, just making the best use of what you have 😀
Update: At reader Victoria’s suggestion, I used a light dusting of Guerlain Meteorites powder instead. The effect is more subtle, diffused, and looks impressively flawless and glowing! Has to be seen to be believed! 😀
Update #2: I now prefer a sheerer finish and a lighter texture of foundation on my skin so instead of using my brush to “draw” on the lines, I use my fingers to pick up a thin layer of product and draw the 5 lines on my face, then buff it out with a brush. Start from the middle of your face. I find that using my fingers to apply the foundation “lines” result in less foundation going on my skin and a thinner layer and then buffing and blending it out results in a lighter, sheerer finish that I now prefer. Once I top up with concealer and a finishing powder or setting powder, I’m good to go with a translucent, flawless finish. Try it if you feel that some foundations look too heavy on your skin – this method helps! 🙂
Have you ever tried a foundation application tip like this? Will you try it?
Go on, try this tomorrow and let me know how you like it. I love it, and I think its brilliant and so is Junior! It has to be, because I never do “tutorials” and voila! Here’s one just for you. Remember to let me know how you like it! 😀
Paris B

Informative. I will try it with bb cream <3
It definitely works with BB Cream because that was what was shown to me 😀 Hope it works for you!
Just tried this for two days in a row. With two different formulas. Mind. Blown.
It brings all the principles of foundation application together. We always knew it was about center of face first, and we always knew to use ‘only where you need it’ but nothing brings it home like this very visual technique. Most importantly, it is so forgiving towards foundations that are not absolute colour matches, which for my very red facial skin and pale neck, is a godsend. Now I can use my 20+ foundations with ease and confidence. LOL.
Waaah Kathia, thanks for letting me know this works and you are actually very right about it being forgiving for foundation shades. I just used one today that I usually find a bit dark but because we actually don’t use very much and blend it out a lot, it works! Less complaints from me now about the poor colour matches in my collection 😀
I’ve literally just tried this and I’m in love with the final effect, thanks for sharing this great tip Paris!
Hugs from an affectionate reader who doesn’t have a lot of time to comment but never misses a post 😉
Thank you so much for letting me know it works for you S! I love that you love it too 😀 Thanks for reading even if you don’t comment – I appreciate it anyway! 😀
I have to say that I never used brush for liquid foundation. Always with fingers. Only one cream foundation I applied with beauty blender…
I used to be fingers only too, Catherine but lately, its brushes all the way for me. The finish does look better but then its a personal thing too 🙂 I still haven’t tried the beauty blender – perhaps I should one day!
This tutorial is amazing! It’s so easy to follow, and I bet your saving so many women from that daily struggle of not knowing how to apply their foundation properly. Love it!
Thanks Monae, glad you liked it!
This tutorial is a boon to girlkind! Thank you! =) Just a question. When you say blend outwards from centre of the face in step 3, do you mean blend in mini circles, or in a linear to-and-fro motion? If both methods are fine, which do you think works best?
Happy you found it useful Rafa 🙂 When I start blending out the product, I use a linear stroke and then I use circular strokes to buff and blend it further. If I only had to use one, I’d use the circular strokes because I find that it blends product better without having any visible brush strokes
hi paris B,
i absolutely love shiseido perfect foundation brush. Its fast and can always count on it to get a prefect base. My customers love the brush too, plus its affordable (at only rm98!!) compare to bobbi brown brushes. Love and enjoyed your reviews, keep it up gal!!
Absolutely right, Ben 🙂 The Shiseido brush is perfection and its relatively affordable!
Excellent! It all makes sense 🙂 I’m trying it tomorrow.. Will try experimenting with fingers too but use the same 5 stripe technique!
How did you like it using fingers? Not having used fingers to do my foundation in a while, I actually find it a bit streaky but the warmth of the hands do set product better 🙂
You looked perfect! You make me wanna go get a foundation brush too. And i don’t have one because i dread the daily washing part.
Its a dream, I promise! I actually don’t wash the brush everyday. I know, its bad of me and I”m probably just asking for trouble 😛 But since its just me using it, I rub the brush over a piece of clean tissue after using and then wash it every other evening or when I remember 😛 Probably not a recommended action if you have sensitive skin but my skin handles it quite well *touchwood*
I tried this method using my bobbi brown cream compact n it worked well! Skin looks flawless n its easier than using a puff. I powdered my face but skipped my cheeks n used a blusher to highlight instead. Thumbs up!
Awesome, Esther! Thank you for sharing that it works too with other textures!!
I thought everybody did it this way 😀
LOL Now you know none of us do!
Can you do a review on NARS products?
Hi Kristin, I have a couple of upcoming Nars reviews 🙂 I have covered the Nars blushes here and here a long time ago, as well as why I no longer like them as their packaging sucks. I no longer buy Nars blushes and have given away many. I have a couple of their eyeshadows and have reviewed one here. Also, I’ve tried their lipsticks in Gipsy and Manhunt. I also tried the Sheer Matte foundation which didn’t work for me.
Thanks for the reminder though. I think it’s time for an update and what I think of the products I’ve tried, so I’ll try to do that soon. Have to find all the Nars stuff I have lying around. I don’t use them very often LOL! 😛
wow that’s a really quick reply! I’ve the same problem with Nars blushers’ too!! And it’s so annoying.
How are their concealers?
I can never to be able to find an eye concealer which will not sink into my fine lines 🙁
I love the radiant creamy concealer! Hg material 😉 the casing is why I no longer buy the blushes or shadows. I can’t handle the horrible disintegrating packaging