I love learning new and different ways to apply my foundation base. I used to use my fingers a lot, and when I was taught the super quick way of using my palm to spread the foundation on my skin, I was sold. I used this method for a long time, until I came upon the Perfect Foundation Brush. Then, it was brushes all the way for me.
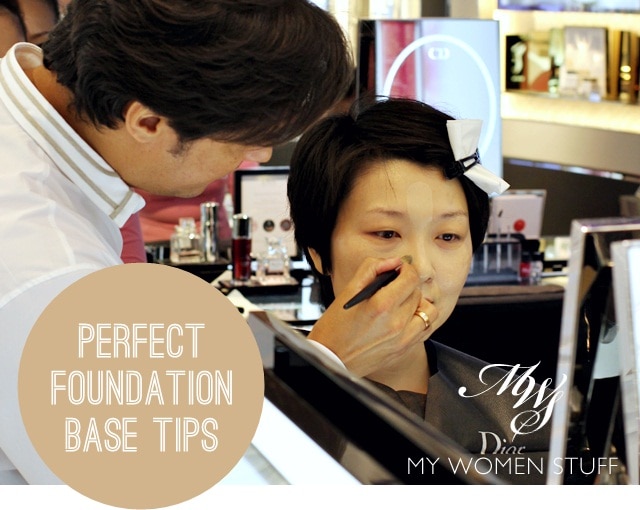
I’ve shared a few Makeup Artist tips for applying foundation (Clinique, Lunasol, Estee Lauder, Dior) but here’s one from a Dior Pro-team International Makeup Artist that I just have to share by way of a tutorial, because not only is it fast, its easy and error free and importantly, gives me a beautiful base every single time 😀 Makeup Artist to the stars, Junior Cedeño applied this for me, using the Diorsnow BB Creme but I’ve since tried it with BB Cream and liquid foundation, and it works very well for both.
This is now my go-to method for applying base and if you can draw lines (doesn’t even have to be straight lines!), you will love it too! 😀
Here’s what you’ll need:-
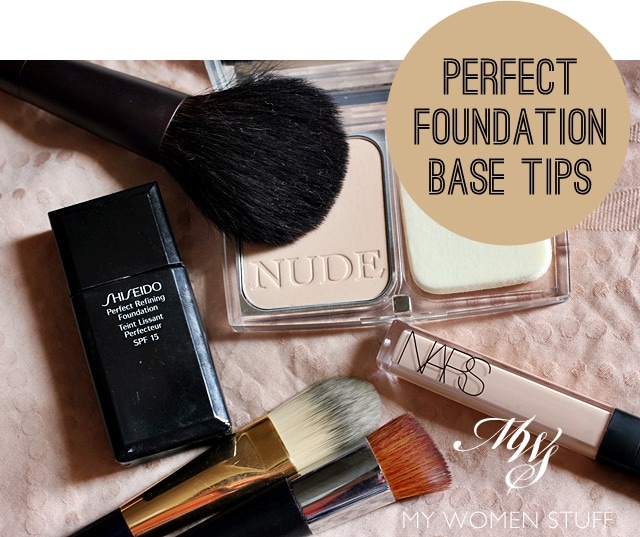
- A foundation brush – doesn’t matter of its paddle brush or flat top brush (Shown in picture Estee Lauder flat foundation brush and Dior Backstage Full Coverage flat top brush)
- A powder brush – Shown in picture Lunasol Face Brush
- Your favourite liquid foundation – shown in picture Shiseido Perfect Refining Liquid Foundation I00 Very Light Ivory
- Your favourite concealer (if needed) – shown in picture Nars Radiant Creamy Concealer in Vanilla
- Your favourite powder foundation – shown in picture Diorskin Nude Powder Compact foundation 010 Ivory
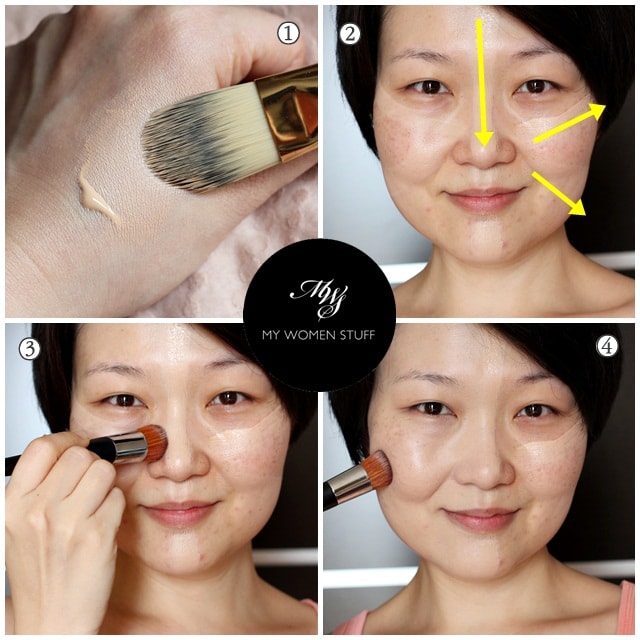
- Pump your liquid foundation on the back of your hand. Use your favourite foundation brush, spread out the foundation with the brush, loading it up on the bristles. I’ve tried with the regular paddle brush or the round flat top brushes and they both work. Junior used the paddle brush so I show you a paddle brush but I usually use the flat top because its just quicker.
- Using the brush, draw 1 thick line straight down the centre of your face from forehead to chin. You should always start applying your foundation from the centre of your face outwards. This is also what we learnt from the makeup artist from Lunasol earlier. Junior just made it easier to put into practice. Pick up more product and draw a line on your cheeks from your nose outwards to your cheekbones. Repeat on the other side of your face. Draw in a line from nose to jawline. I drew in arrows to make it easier 😀
- Now, blend the product outwards from the centre of your face towards the sides. You will find it very easy to do, and you’ll spread out the product thinly enough so it’ll look natural. Most of the product will be on the middle of your face, which also gives the illusion of light and thus, makes the middle of your face look more prominent. The sides of your face usually need less product. Junior’s tip was that this gives the most natural look to your skin as the products go just where they should, and when working with a base, you want to look as natural as possible.
- You can probably see from this picture how the blended half looks as opposed to the unblended half. This is one of my favourite liquid foundations and its very easy to work with and coverage is pretty good too.
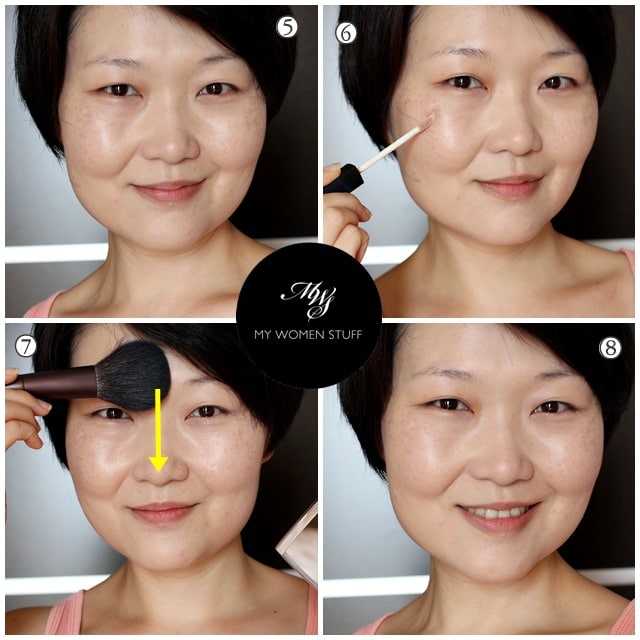
- Here’s what it looks like after you’re done with just your foundation. Naturally, the effect will depend on the foundation you use but you will generally find that your skintone is more even and the effect is very natural because you don’t over use product on your skin.
- Touch up concealer where you need it e.g. undereye, blemishes etc. Junior used a bit more foundation for a more transparent, natural look; or he said you can also use a concealer for more coverage. I used a concealer because its faster for me.
- Take a fluffy powder brush, lightly pick up some powder foundation or setting powder and lightly apply on the centre of your face – forehead, nose, chin – and blend to the sides. Again, follow the arrow. For a natural finish, Junior’s advice was not to apply loose powder all over as it can look too matte and too flat. Apply only on the centre where you will oil up first, and this will hold everything in place.
- That’s it, you’re done! Now admire your flawless self 😀
I have tried this with various liquid foundations and it works. How sheer or how full the coverage is depends on your foundation. This method also ensures you do not over apply product and that you use just enough for your face. Generally, 1 pump of foundation suffices every time, and you don’t end up overdoing certain areas of your face that may not need the foundation at all. There were some foundations I found patchy before but now, they are a breeze to apply!
What I like is that by using this method, I now have a more even finish and its surprisingly fast! Doesn’t even take me 5 minutes to sort out my base makeup and I’m always left with a beautiful finish each time. This is a backstage tip and you know how fast they have to work backstage for fashion shows, so they have no time to waste. This stripey method was quick, efficient and effective.
The trick with using a powder foundation to set just the middle bit of your face was quite a genius idea too. I found that it did help control oil better, and my foundation did not fade off as quickly as they sometimes do. You know how it is when you find your nose turning shiny by day’s end and your base gone? This helps to prevent that. Of course, if your foundation does not suit your skin or turns it oily and slips off then it won’t help. This assumes that you are already using a foundation that suits your skin – its not magic, just making the best use of what you have 😀
Update: At reader Victoria’s suggestion, I used a light dusting of Guerlain Meteorites powder instead. The effect is more subtle, diffused, and looks impressively flawless and glowing! Has to be seen to be believed! 😀
Update #2: I now prefer a sheerer finish and a lighter texture of foundation on my skin so instead of using my brush to “draw” on the lines, I use my fingers to pick up a thin layer of product and draw the 5 lines on my face, then buff it out with a brush. Start from the middle of your face. I find that using my fingers to apply the foundation “lines” result in less foundation going on my skin and a thinner layer and then buffing and blending it out results in a lighter, sheerer finish that I now prefer. Once I top up with concealer and a finishing powder or setting powder, I’m good to go with a translucent, flawless finish. Try it if you feel that some foundations look too heavy on your skin – this method helps! 🙂
Have you ever tried a foundation application tip like this? Will you try it?
Go on, try this tomorrow and let me know how you like it. I love it, and I think its brilliant and so is Junior! It has to be, because I never do “tutorials” and voila! Here’s one just for you. Remember to let me know how you like it! 😀
Paris B

I am going to print this tutorial and stick it next to my mirror. Haha. Your tutorial is easy to understand, especially with the arrows. Hehe. I find that 1 pump of foundation is sufficient for the whole face (my face). However, I can’t help but noticed that some women tend to apply foundation as if they are applying moisturizer on their face. It makes me wonder whether I am doing it wrongly (1 pump of foundation) or they love their foundation too much.
Hahaha! Don’t let it scare you in the mornings! >.< But seriously, I'm glad you found it useful. I did it on a whim and it all came together quite easily 🙂 I'd love to know if it works well for you if you try it! I don't think we ever need more than 1 pump of foundation or even less, if its a good skin day. Too much is unnatural and can look quite horrible!
I even laminated it. Haha. I’ve tried this morning. BB cream application is a breeze. Plus, it doesn’t take too much time. So happy about this.
I’ve been to a makeup workshop recently. Some of the participants are young and have good skin. However, they loaded up on the foundation. It’s as though they are slathering cream mask on their face. I was the odd one – I used only 1 pump of foundation and was wondering whether I did it wrongly. IMO, they should learn to appreciate their good skin and love their good skin.
Oh my! Laminated! LOL!! I’m really happy with this tip so I’ really happy that so many of you like it too 😀 I think many people mistake putting on makeup with covering up all of their skin with product. For so many of the young ones, all they need is a touch of powder and maybe some light colour. That said, perhaps their online role models give the impression they all have to look like porcelain dollies 😛
Yes. I like to look at it when I am standing in front of the mirror. I love make up tutorials for obvious reason – I am a noob when it comes to make up. Hehe.
I met a young blogger once. She has beautiful skin without any make up on. It is unfortunate that she has the mindset that she doesn’t look beautiful without any make up. You should have seen her skin. It is flawless and radiant. Just like baby skin. OMG. I want!
I wish people with beautiful skin would realise they don’t need foundation, at all! At most, a light tint will suffice for them. Ah to have beautiful baby skin again 😀
Off-topic but I like the new mobile layout! I usually read MWS on my phone and this makes it 10x better. 🙂
Thanks for noticing, Rinnah! 😀 I didn’t want to make a big song and dance about it because the last time I did, the whole thing crashed and burned on me. This time, I’m staying quiet and letting it do its job! 😀 Thanks for letting me know it works!
Definitely gonna try this the next time I apply foundation! Thanks for the tips, Paris!
Have a great Tuesday! xx
Do let me know if it worked for you Charlotte! I’d love to know if you found it easy or if it was fussy 😀
I still prefer fingers and I rarely apply a full pump of foundation. I wonder if this will work with my tinted sunscreen…
But it looks like a more efficient way of applying foundation. I normally prefer to leave hardly any foundation on my nose and chin because I find that foundations tend to slip and settle into pores in this area. I reserve most of the coverage for my red cheeks. 🙁
I reckon the tip works with all types of bases, not just foundation 🙂 I used to think the same as you, prefering not to apply too much of the foundation on the nose area but to my surprise, I revised this view because once I dusted on the powder, everything set. I don’t have oily skin though so I’m not the best person to know if it’ll slide off, but so far, so good 🙂
I’m just not so keen on brushes due to hygiene reasons (need to wash them every day), they absorb product and I like the warmth of my fingers melting my product and allowing me to sheer everything out.
My skin is your skin twin, so combo and oily on the nose and chin. I guess I am just very particular about foundation finish and I tend to break out if I overload product on my oily areas. :/
Oh yes, brushes and hygiene, perfectly valid point! Its quite a hassle I will agree 😛 I really should be more diligent about washing my brushes but it does explain how I amass a few of them so I don’t have to wash them immediately 😛
I really love this tutorial. Thanks Paris, will definitely try this the next time I apply foundation. But I guess in order to apply this method, I would need a similar blush for blending i.e. either the Shiseido or Dior foundation brush?
Do let me know how it works for you Victoria 🙂 I’d love to know if anyone else finds it as easy and useful as I did 🙂 You don’t have to use this brush. I only showed it because its what I use. Junior used the regular paddle foundation brush to spread it out and blend 🙂
Forgot to ask, have you tried applying loose powder (such as your favourite meteorites) instead of powder foundation in step 7 and if yes, what was the effect? I know Junior said it would appear too matte & flat but just wanted your opinion.
Yep, loose powder will work too. Powder foundation offers a bit more coverage but really, there isn’t much of a difference because you only need a sheer layer. I would use meteorites over it all because I don’t treat that as a setting powder. What Junior really meant was that there’s no need to apply an additional layer of powder all over the way we’ve been taught to all this while, just down the centre where we oil up most usually 🙂
Great tips and I love the mobile layout.
I don’t apply too much on my nose though. I oil up there most, and I find that it works better if there’s only a sheer layer of foundation there, and touch up with powder once in a while. I apply my foundations starting at the centre of my face too and it’s good to know I’ve been doing it right 😛
Thanks for letting me know the mobile layout works 🙂 I used to not apply much on my nose area but soon realised that when whatever little there slips off, it looks off when the rest of the face is still on! LOL Still, I suppose we should adjust according to our skintypes 🙂
great one you got here PB…
h/ever do not own any foundation brush at the moment..
still looking for an affordable one like ecotools maybe..
or splurge one like shiseido..
I do own shiseido foundation shades 040 tho…
Hi Wan, Glad you enjoyed the tip! Yes, you can quite easily use whatever foundation brush you have right now. Ecotools will work or even the Real Techniques Expert Face Brush which I like too. The brush isn’t too important for the tip, its more of the placement of the product that is important. The brush will help give a more even flawless finish but you can work up to that with what you have 🙂
i’ve tried this method juz this morning…
apply with my finger…later on spread with my palm..
easy measy and very quick and nice finishing…
Lovely! Thanks for letting us know it works for you 😀
I love you! Please give us more of these ‘secrets’ pleaseeeee.
We know of methods and methods and methods but I generally do not try new ones unless I see you do it! See how influential you are 🙂
Very happy you found this useful Honey! Do let me know if it works as well for you as it did for me! I’ll be sure to share more tips and secrets as I come across them, and of course, those that I have tried and which work well 🙂 Thanks for the trust (heavy burden ok! LOL 😉 )
Tried it! This technique actually speed up the foundation application and blending time. I use my Sigma brushes and I even do this for my sunscreen. Definitely one of your best tips. Cheers!
Hurrah! So happy that it works for you too Honey! I think its one of my best tips too LOL! 😀
Woohoo good to know that I apply it almost the same way except point 2. Of the topic, do you think the Shiseido foundation will work for oily combination skin? thank you.
Nice one Undraa, now you have to do Step 2 and you’re set 😉 I can’t say for certain if the Shiseido foundation will work on oily skin but I do know of some people who have oily skin and have no complaints. Sorry I can’t help you there!
Yay, great tip, Paris! It took me a long time to figure out that foundation should be concentrated on the inner parts of the face and then blended outwards–I used to just glop it on equally to all parts of my face. I ended up with a very heavy, made-up feel. Now that I just focus on the inner parts and blend out, the effect is so much more natural! 🙂
Haha I was exactly like you Becca! I’d dollop them on like I do moisturiser then wonder why I look like I fell face first in skin coloured powder >.< I'd learned about focusing product on the centre of the face only recently but nothing puts it in perspective like drawing a line down your face LOL! So happy I never have to worry about thick cakey makeup again after this!
U made me wana buy the shisedo foundation brush again……Arrrgghhh! Because my current brush is unable to reach the sides of my nose.
Hey Esther, you don’t need the Shiseido brush for this tip. Any foundation brush will do, although you may have to work them a little more thats all 🙂
Hello Paris~ This tutorial will help me A LOT. Wow. I can’t wait to try it! I’ll definitely try it! It can help me to save time too. Thanks so much!
Hi Rin, I’m happy you found it helpful! Do let me know after you’ve tried it if it works well for you or if you found it easy. I swear its totally changed the way my base looks and for the better! 😀
Lovely post! I am going try out this method tomorrow. Thanks for sharing this awesome tutorial! I always like to try out different way in applying foundation to achieve a flawless finish.
I’m glad you found it helpful, Elaine 🙂 Would love to hear if it worked for you when you tried it out 😀
Awesome tutorial! Very clear informative pic + details. Love it!
Shu Uemura is actually the first to introduce & used brushes to apply foundation & for cleansing. They even have special brushes for that purpose. Shisedo as well.
Thanks Vera 🙂 I didn’t know that about Shu Uemura but they do very good brushes. I haven’t used their foundation brushes, but the Shiseido Perfect Foundation Brush blows me away everytime!
I am always looking for tips to achieve a flawless base makeup, this way of applying liquid foundation is new to me I have never seen any beauty guru showing this on Youtube THANK YOU SO MUCH for this step by step pic tutorial I will try this too
Hi Sataa, I’m glad you found this useful! 🙂 I only just learned it myself and its amazing just how good it looks. I’d love to hear from you when you’ve had a chance to try it and see if you too found it easy and flawless 😀
Love this tutorial! I’m definitely going to try it tomorrow!
Would love to know if you found it easy, Gio! 😀
Genius! Gotta try this. I’m usually a beauty blender kind of person, but it’s too much of a hassle when I want to apply my foundation after gym. This method, I can definitely do at the gym. 😀
Oh hello there! 😀 I still haven’t gotten round to trying the beauty blender so I really can’t compare, but you can’t beat this for convenience and speed! 😀 It does look a bit weird in Step 2-3 but you get through them quite quickly. Do let me know how it goes for you!
This is crazy fast! I’ve tried it twice the past weekend and am really impressed. Super speedy. Definitely going to be my post-gym go-to method now. 😀 Convert!
Huzzah! Its what I do every morning now and takes me half the time to do my base!
I wanted to comment AFTER I’ve tried it out. I did today! I used the Shiseido brush. My foundation of choice was Bourjois 1-2-3 Perfect + a dash of Revlon Skinlights. I LOVE YOUR TIP! You’re right, it was so easy! Mixing the 2 liquids together gave a rather runny effect so using fingers to blend was a little messy. With the brush, I swiped on 3 strokes and a dot. 1-down the T-zone. 1 each to the cheeks and a dot on the chin. After blending, I warm my hands and cup my cheeks to “settle” the foundation. I skipped the powder because my skin is dry enough as it is.
THANK YOU! THANK YOU! THANK YOU! Love the tip!
Yay! Thanks for letting me know that it works as well for you too! 😀 😀 I love the idea of warming up the foundation to set. Brill! I used to do that before but stopped doing it (mostly because I didn’t want to have to keep wiping/washing my hands) but you reminded me just how good it was so I’ll try it tomorrow! 😀
This is very useful! The before and after photos are very good and informative too, thank you!
Glad you found it useful, Tammy! If you do try this, I’d love to know how it fares for you!