Last week, I was invited to speak to Mr. Toru Kobayashi, RMK Makeup Artist, and to learn a little more about the RMK brand and the RMK Style of makeup. I love talking to makeup artists – there is a tip to learn from every single one of them, and Toru Kobayashi was no exception. Although he spoke only Japanese, an interpreter and his effort to get his message across to me helped tremendously. I took away some excellent Japanese makeup tips on applying makeup the Japanese way, and I think that sharing is a good thing! 😉
Japanese Makeup Tips: Base Makeup Is Very Important

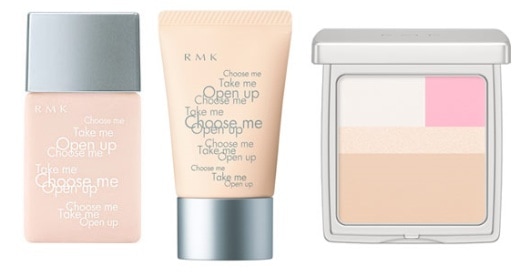
L-R: RMK Control Color N, RMK Smoothing Polished Base, RMK Pressed Powder N
I’ve noticed that the Japanese brands place a lot of emphasis on the base. They take great pains to ensure that the base makeup which includes primer, concealer, foundation and highlighter is done well to create a natural yet flawless look for the skin. A base done well, combined with well applied mascara and a light lip is good enough for a barely there style of makeup which the Japanese favour, Mr. Toru proclaimed. Although he uses RMK products, I’ll try to tell you about other products which might fit the bill approximately 🙂
Hide pores with a primer
Toru-san’s favourite product for creating the perfect base is the RMK Smoothing Polished base (photoshop in a tube!) It covers pores, creates a smooth base to work on and helps foundation last and last. He only applied it on selected areas – nose including the sides and on the cheeks.The smoothing effect is visible almost immediately hence it being photoshop in a tube. You could probably get a similar effect with a primer or tinted skin smoother of your choice. Clarins makes one but as luck would have, it I can’t find my sample! 😛
Apply concealer with a light touch and set with pressed powder
The next product was concealer which Toru-san told me must be applied in a very thin layer or you risk it looking cakey. For most of us, we’d try to use concealer liberally to conceal our dark circles or blemishes. Toru-san only applied a thin layer, blending it on the back of his hand before patting it on the skin and then used the pressed powder in the RMK Super Basic Concealer Pact to set it.
Tip: Blend concealer on the back of your hand and then tap it where you need it to avoid it going on too thick
I tried this using my own concealers, and then lightly setting it with a loose powder applied with a fluffy brush. The effect wasn’t quite as perfect, but it was close, and surprisingly, just a little bit of concealer did the trick!
Highlight parts of the face for a 3D effect
Toru-san used the RMK Control Colour N which looked like a white shimmery liquid, a bit like a liquid highlighter. He applied it around the eye area, tops of the cheeks, and beside my mouth, and a touch on the bridge of the nose. This draws attention to the eye area and gives the face a 3D effect. He then applied a very light pink shimmer powder to brighten the skin. I attempted this with a liquid illuminator and there is a similar effect albeit a little more subtle.
He also used the new RMK Pressed Powder N which is a pressed powder with corrective qualities in one. It brightens the complexion and the top colours can help with colour correction and for a skin brightening effect.

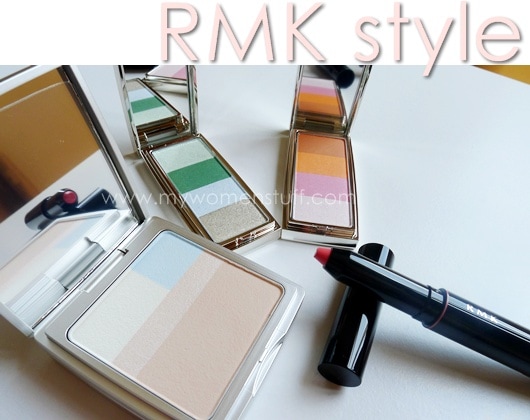
Clockwise from Left: RMK Pressed Powder N (Blue to cover redness or brighten sallow skin), RMK Mix Colors for Eyes EX-04 (green) Shiny, RMK Mix Colors for Cheeks EX-02 (Shiny) RMK Lip Crayon 01 Pink
Use foundation sparingly and only where you need it
This tip was a bit new to me. When I apply liquid foundation, I just slap it on my whole face. Toru-san however, only used very little, and applied it to the bottom half of my cheeks near the jawline, forehead and the sides of my nose and face, avoiding the areas which he had previously used the concealer and highlighter. I asked why this was the case.
The answer is that you don’t need foundation on your whole face. Once you’ve got your base and concealer on, applying foundation on top of that would be too thick and it can look too unnatural. I found it most intriguing. I tried this with my own foundations and I have to say that Toru-san is right (of course he is!) When I’d got my base on, the foundation was just a “touch up” for areas that I had not used concealer on before. The overall effect is a much more natural “my skin but better” look. Try it for yourself and see 🙂 You might find you actually end up using a lot less product than previously! 😀
A light gold/cream shadow under the eyes erases tiredness
I must have looked tired when I went for my interview because the rims of my lower line were red. Toru-san used a light gold shimmer shadow to line my lower lash line. This would counteract the redness and help lift and brighten the eye area and prevent you looking tired. It was just a very very light wash of colour but it did the trick! I instantly looked less tired!
Japanese Makeup Tips: Proper curling of lashes and mascara opens up your eyes
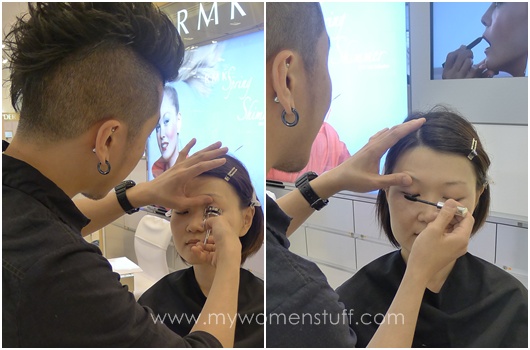
I was surprised when Toru-san started the point makeup with mascara. For him, the RMK Style is all about a good base or foundation and properly curled lashes with mascara to draw attention to the eyes.

Proper way to curl lashes
I was a little surprised when Toru-san told me that I should not curl my lashes from the root. That throws every single eyelash curling lesson I’ve learned out the window! According to him, based on my eye shape and lashes (stick straight lashes that point downwards) if I curl from the root, the curve would be too steep and I’d get an unnatural kink to my lashes. I found myself agreeing because I do have that happen often.
He told me I should start curling my lashes only about midway and walk the curler to the ends. This would be more natural and when he did it, the curled lashes were beautiful! My lashes looked long and curled up and even without mascara, I noticed how wide-awake I looked.
Tip: When curling lashes do not only curl from the front. To get the lashes at the sides, turn your head when looking into the mirror and look to the left to ensure you get your outer lashes; and to the right to get your inner ones.
Most of us just squeeze our curlers and hope for the best, don’t we? This ensures we grab and curl all our lashes. The effect, when properly done, is stunning!
Do not over apply mascara on your lashes
When applying mascara, there is no need to apply too much. Apply the 1st layer then wait for it to dry. If you layer on your mascara while wet, your curled lashes will droop because its too heavy. Once your first layer dries, continue to your eye makeup and then come back and layer on another layer of mascara if you feel it necessary.
Mascara on top of dry mascara will hold the curl. Mascara on top of wet mascara will cause it to droop. Good tip this one!
Eyeliner is not for everyone
This tip caught me by surprise. At this time, I had my mascara on, and some light shimmery eye makeup and I expected eyeliner to be next. However, Toru-san told me that for me, I should not apply eyeliner. A first eh? Which makeup artist would tell you that?
The reason he told me, was because due to my eye shape, eyeliner would result in my lashes being hidden and diminishes the effect of my eyes as it would look too harsh. With properly curled lashes and once mascara is applied, I could already see some sort of definition to my eyes and to him that was sufficient. What I should do, is tightline – draw eyeliner UNDER my eyelids. This has a less harsh effect, yet emphasises the shape of the eye. If you have a single lid as I do, and shallow set eyes, try this tip – its a bit of a surprise, but it does give a very natural “my eyes/lashes but better” look.
I must say however that this tip is true if I were to focus on a lighter more natural style of makeup (which it so happens I’m gravitating towards now). If I were going to go dark on the eyes, I think having eyeliner on would be quite necessary for definition.

Close to, it was rather shimmery for the most part. The eyeshadow (Summer 2011 palette) in particular was a little shimmery and so were my cheeks, so I would probably tone it down for everyday. But otherwise I was happy with the look, especially how with just base makeup, he managed to draw attention to the eyes in such a subtle manner. Since this is a look I’m gravitating towards these days, it was most opportune to pick up these tips! 🙂
Here’s a quote I picked up from the RMK website
But above all, ‘with RMK, the first thing people will always notices is you, not your make-up,’ believes Rumiko. ‘I just want to make you feel comfortable with who you are.
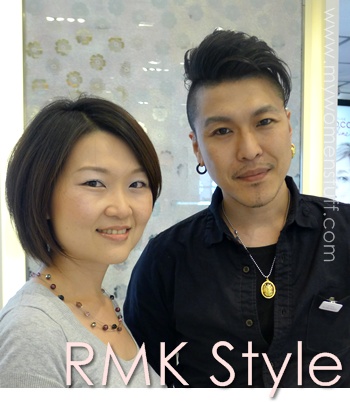
I think this is one of the best makeup philosophies I’ve come across 🙂 I applied my makeup here following most of the tips Toru-san taught me, using my own products, and I must say that I liked the effect. Its not so noticeable in the photo but in real life, my eyes are more pronounced even with just a light wash of colour and without eyeliner, my lashes look much more prominent, and my base makeup looks lighter.
Did you learn something new from the tips shared here?
Paris B


I’d say these tips are really revolutionary, especially the ones about curling your eyelashes, foundation and eyeliner! And I have to say you look absolutely fabulous after your makeover, Toru-san really hits the right spots regarding your face/eye make-up 🙂
Thanks Stephanie and yes, his tips most certainly made me think long and hard about how I should do my makeup… and I’m really liking the results now! 😀 Hope they help you too! 😀
Awesome post Paris! Thanks for sharing the tips. 🙂 Any makeup base or primer to recommend? As I seldom hear about that from your blog 😉
Truth is, Junni, I don’t use makeup primers or base 😛 I can only tell you that the RMK Smoothing base felt light and non greasy on my skin and held up for hours, as well as the RMK makeup base. I am presently trying out one from Dior but I’ll only have my thoughts on that coming up later. I’ve tried Smashbox primers and they do hold up quite well too. Sorry i’m not much help 😛
🙂 I’ve guess so, I hardly remember you recommend or review one before. I’m pretty faithful reader huh? :p well, me too, skip the base cos hardly have extra time, been thinking of shu uemura makeup base. The only I’ve tried was shiseido’s, not bad though.
The Shu mousse base isn’t bad but I found it a little drying. I’m presently using a Dior one – hydralife I think – and while it is light and friendly to my skin and I do notice my foundation staying on better, its not something special. I think the Clarins sunscreen makes a much better base, and you get nice SPF40 in that which is all good!
What do you mean by ‘walk the curler to the ends?’ I press the curler midway and then?
Fit curler on lashes. Press curler, release. Move curler a little outwards. Press, release. Repeat until you reach the ends of your lashes. Its like a walking motion, and usually is about 3 times depending on how long your lashes are. Hope that helps!
Yes, it does, thanks! However, when I fit my curler midway and press, my lashes end up with a 45 degree curl. Hmm.. perhaps I should not press so hard..
Oh yes, do not squeeze your curler very hard. Just press it lightly, enough to see your lashes curl, but not so hard as to force it to kink. Walking the curler results in a smoother curl 🙂
The applying of foundation only on selected areas is new!
Japanese makeup is all about having a natural look. I used lots of foundation before, but for a year now I only apply it on my T-zone whenever I want a more polished look – if not, then I use only concealer near the outer corners of my eyes. I disagree with the tightlining since I’m more on the wild side. 😀 I love to put some emphasis on my eyes whenever I’m using a lighter shade of lipstick. But I do agree with everything else: learning to wait for the mascara to dry before re-applying was a turning point in my life. Mainly because I don’t curl my lashes (too lazy, meh). Good tips!
Great tips and wonderful post PB. A few new and revolutionary tips there. Never heard of the “no need for eyeliner” tip before, but this I gotta try! The look goes well with you, PB. Polished, yet natural. 🙂
I know! That tip threw me off too but it is quite interesting (although he did say it was something that would be more suitable for my eye shape and for a light makeup look)
I tried this and is the best thing to my makeup routine….my skin looks luminous and doesn’t have that obvious ‘i have foundation on’ look!
Hi, I think this entry contains some of the best make up tips that I’ve ever heard so far. I would love to try the look on myself. Would you mind to list out all the items used by Toru-san for this makeover? I’d really appreciate it! ^ ^
Hi Nik, thanks unfortunately, its been so long that I’ve forgotten what the exact items used were. Sorry! Besides, you could use any product, not necessarily everything RMK 😉